We have previously discussed about our important Timesheet Signoff feature and the different user types that can be created to take advantage of the functionality. Today we will focus on the Operation Manager user type.
The first step to set this up is to login in as an Administrator user, then go to the Administration tab, then Preferences. Inside this section, you will find the following settings, make sure to check "Enable TimeSheet Signoff", while at the same time uncheck "Enable Teams for Operations Manager". The first setting just enables the usage of the whole functionality, but the second one is important to be able to assign tasks to specific managers so that they can focus on approving punches for those:
To create an Operations Manager profile, we need to go to the Administration tab and then Manage Users. There is an "Add New" button on the top left where we can click to see a screen just like this one:
Make sure to set the User Type to "Operations Manager", then adjust the time zone and enter the Login ID and Name of the user. You can skip to New Password and Confirm Password where we recommend to use a strong password for security purposes, then click on "Add New" at the bottom.
The next step is to assign the newly added manager to tasks. The idea behind this is that there could be different supervisors in charge of overviewing different projects, so a company may need to have these supervisors approve timesheets only for their own projects, so they don't need to see other manager's tasks. The way to ensure that is the case, is by following this process of assigning managers to a job, which in turn will enable the system to show those punches in that Operation Manager's web portal.
For this, we go to the "Maintain Task/Customer List" section and in this case we pick a task inside the "Region B" team:
After clicking on its Task ID, we will be able to assign the profile by using the dropdown menu from the "Task Owner/Manager" section. In this example, we have assigned the "BerlinOperations" profile. Then click on Save:
Something important to keep in mind is that assigning Operations Managers to tasks doesn't affect the way that the application works for field employees, as they will be able to clock in and out and switch between tasks as normal without any indication of what manager supervises what project. After the worked period is finished and the time to approve timesheets comes, employees will proceed as usual, which is by going to the main screen, open the menu and select "Timesheet Signoff", then logging in with their credentials:
Next, they will review and sign their timesheets, then send them for approval:
Once confirmed, after a few seconds, a green thumbs up icon will be shown to let the employee know that the data has been sent successfully:
At this point, is where the Operations Manager comes in! In this example, we are signing in as BerlinOperations, then go the Administration tab to find the "Approve Timesheets" section:
We can use the different filters to focus on team or a specific individual, here we want to see Joy Morris' punches for August 5. The Approval Status is set to "Worker Accepted", this means that it's awaiting Manager Approval. We then click on the the timesheet ID on the left of the screen:
That will take us to the Approval screen, where we can review the worked time and view the employee's signature, when we are ready to approve the timesheet, we just click the radial button in the Approve column next to the task that needs to be approved, then click on Save on the bottom left of the screen:
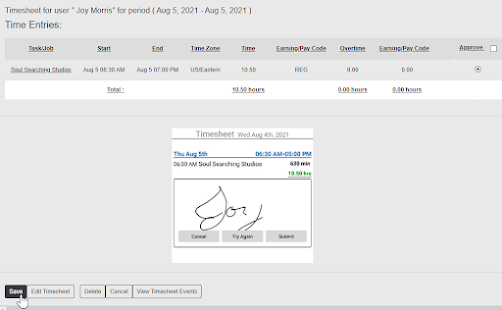 |
| Click on the image to enlarge |
Then we will get a confirmation screen, so we just click on "Save changes":
And finally, when we go back to the screen where we filter the current timesheets, we will see that its status changed to "Management Approved":
That's all for today, leave us a comment below if you have any questions!
--Econz Team


