Friday, October 27, 2023

Improvements to the Worker Leave Screen

Hello everyone! Today we have one that is short but sweet... This is about our Leave Request functionality, which we are always looking to improve to provide more quality of life features to all our customers.

In order to process Sick, Holidays or PTO leave requests more efficiently, you are now able to use different filters to get to exactly the information you need, without the need to scroll or find among a long list.

Let's start from the beginning! First we would log in to the Web Portal and go to the Administration tab. Look for the option called "Manage Leave Applications" within the Staff section:


Once inside, you will notice a set of filters that you can use, such as Employee, Leave Type and Leave Status. Here is a composite image showing examples of these dropdown menus:


You may also have noticed that leave requests will include the total of hours, so it's easier to keep track of employees' PTO balance and enforce any PTO compliance based on this information.

Click on image to enlarge

That's it for this post! Leave us a comment below if you are interested in learning more or have any questions for our wonderful Sales and Support teams.


--Econz Team

Friday, October 20, 2023

Selecting Companies that Sync with ADP

Hello everyone! Continuing with our ADP Integration topic, we would like to talk about a feature that we have implemented when setting up your account with the integration.

This is geared towards companies that may have different branches or locations, each with their own distinct company code, and they would like to only see the employees from their own branch. So, instead of putting every branch together under the same Timecard profile, each can have their own with their own configuration, which will enable the Payroll Department to synchronize with ADP automatically.

To set this up, of course you will need to have an up and running integration already configured in your account. If you do, you can continue with the following steps.

Start by logging in as an Administrator and go to the Administration tab, then click to enter the "Integrate With ADP" option:


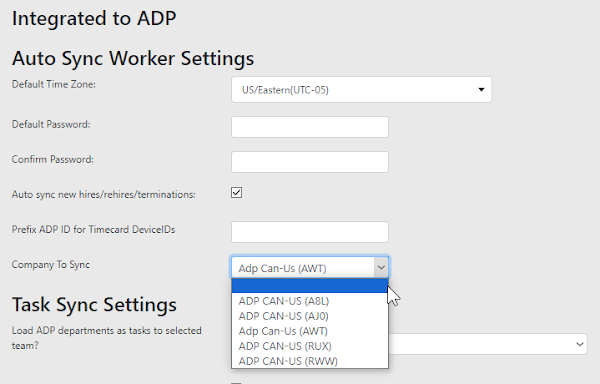
On the next step you will find the dropdown menu called "Company To Sync". If you open it, you will be able to see and choose the company that you would like to auto sync with the current Timecard account. 


Make sure to select the appropriate company/code:


And finally, scroll to the bottom of the screen and click the "Submit" button:


It's that simple! With that, you will have the ability to organize the company profiles however you see fit, in a way that makes the most sense for your organization.

Let us know if you have any questions or comments in the section below. Until next time...


--Econz Team

Friday, October 13, 2023

Creating Custom Reports

Have you ever wanted to create your own report using the information we have on our system? If you have, now you will be able to do it; you can pick one of the existing reports and customize the columns that will be shown when generated.

We love this feature because it allows for more flexibility and in many cases, there might be some reports that could be perfect, but may have a couple extra columns that you may not need, so doing a couple of easy adjustments may be the key to higher productivity! 

Let's go ahead and see how it works! First we go to the Administration tab and select the option "Define Custom Reports":


Then, click the "Add" button:


You can name it as you wish so that it's meaningful to your company, in this case, we want our report to be called "Quick Location Report". We already like the existing one very much, but want to have a more simplified view for some Managers to have a quick overview without having to scroll over.

Next, we choose within the Report Type options, which will enable the report to be generated either as PDF or CSV files, or generating an HTML version that can be viewed directly from the Timecard portal.

With this feature, you can even add your Organization Logo so that it will be added to the PDF file! After this, you can then select the specific report you want to base yours on and in the next field, select the columns that will be displayed by picking their names, and then clicking the "Add" button.

Once ready, it will look something like this:


After that, save it, and you can go to the Reports tab, and your new report will be found under the "Custom Defined Reports" section:


And that's it! You will now have your own custom report with all the functionality as the predetermined reports we offer with Timecard GPS:


Go ahead and give it a try! We are definitely sure that you will have your own list of custom reports in no time, as we do over here...!


--Econz Team

Tuesday, October 3, 2023

New Feature: Deleting Multiple Field Workers

This time we have an excellent enhancement we recently added to our system, which will save you a lot of time in those cases when you may need to remove multiple users from the Field Workers tab. This is particularly useful for large companies whose staff might rotate frequently or that are using an integration that synchronizes the Field Workers list with another software package.

For starters, we should go to the Field Workers tab:


Then, find the users you need to delete and tick the checkbox on each of their names:


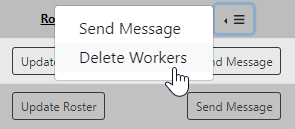
Scroll back up and click on the following icon on top of the first "Send Message" button you have, right next to the "Roster" header, which will show the different options available for the selected devices: 


Select the option called "Delete Workers":


After that, you will get a confirmation screen that lets you review and confirm the deletion you are about to do. If it is correct, click "Yes" and the process is completed.


That's all it takes, it's that simple and it will save a lot of time compared to doing it individually. Let us know if you have any questions or comments below and, until next time!


--Econz Team