Friday, December 11, 2020

Econz Timecard Forms Only Feature

We are excited to announce a new feature called "Forms Only App Version". This version of our Timecard GPS application is intended for customers that are looking to have their field staff to only capture Form data, instead of timesheet information.


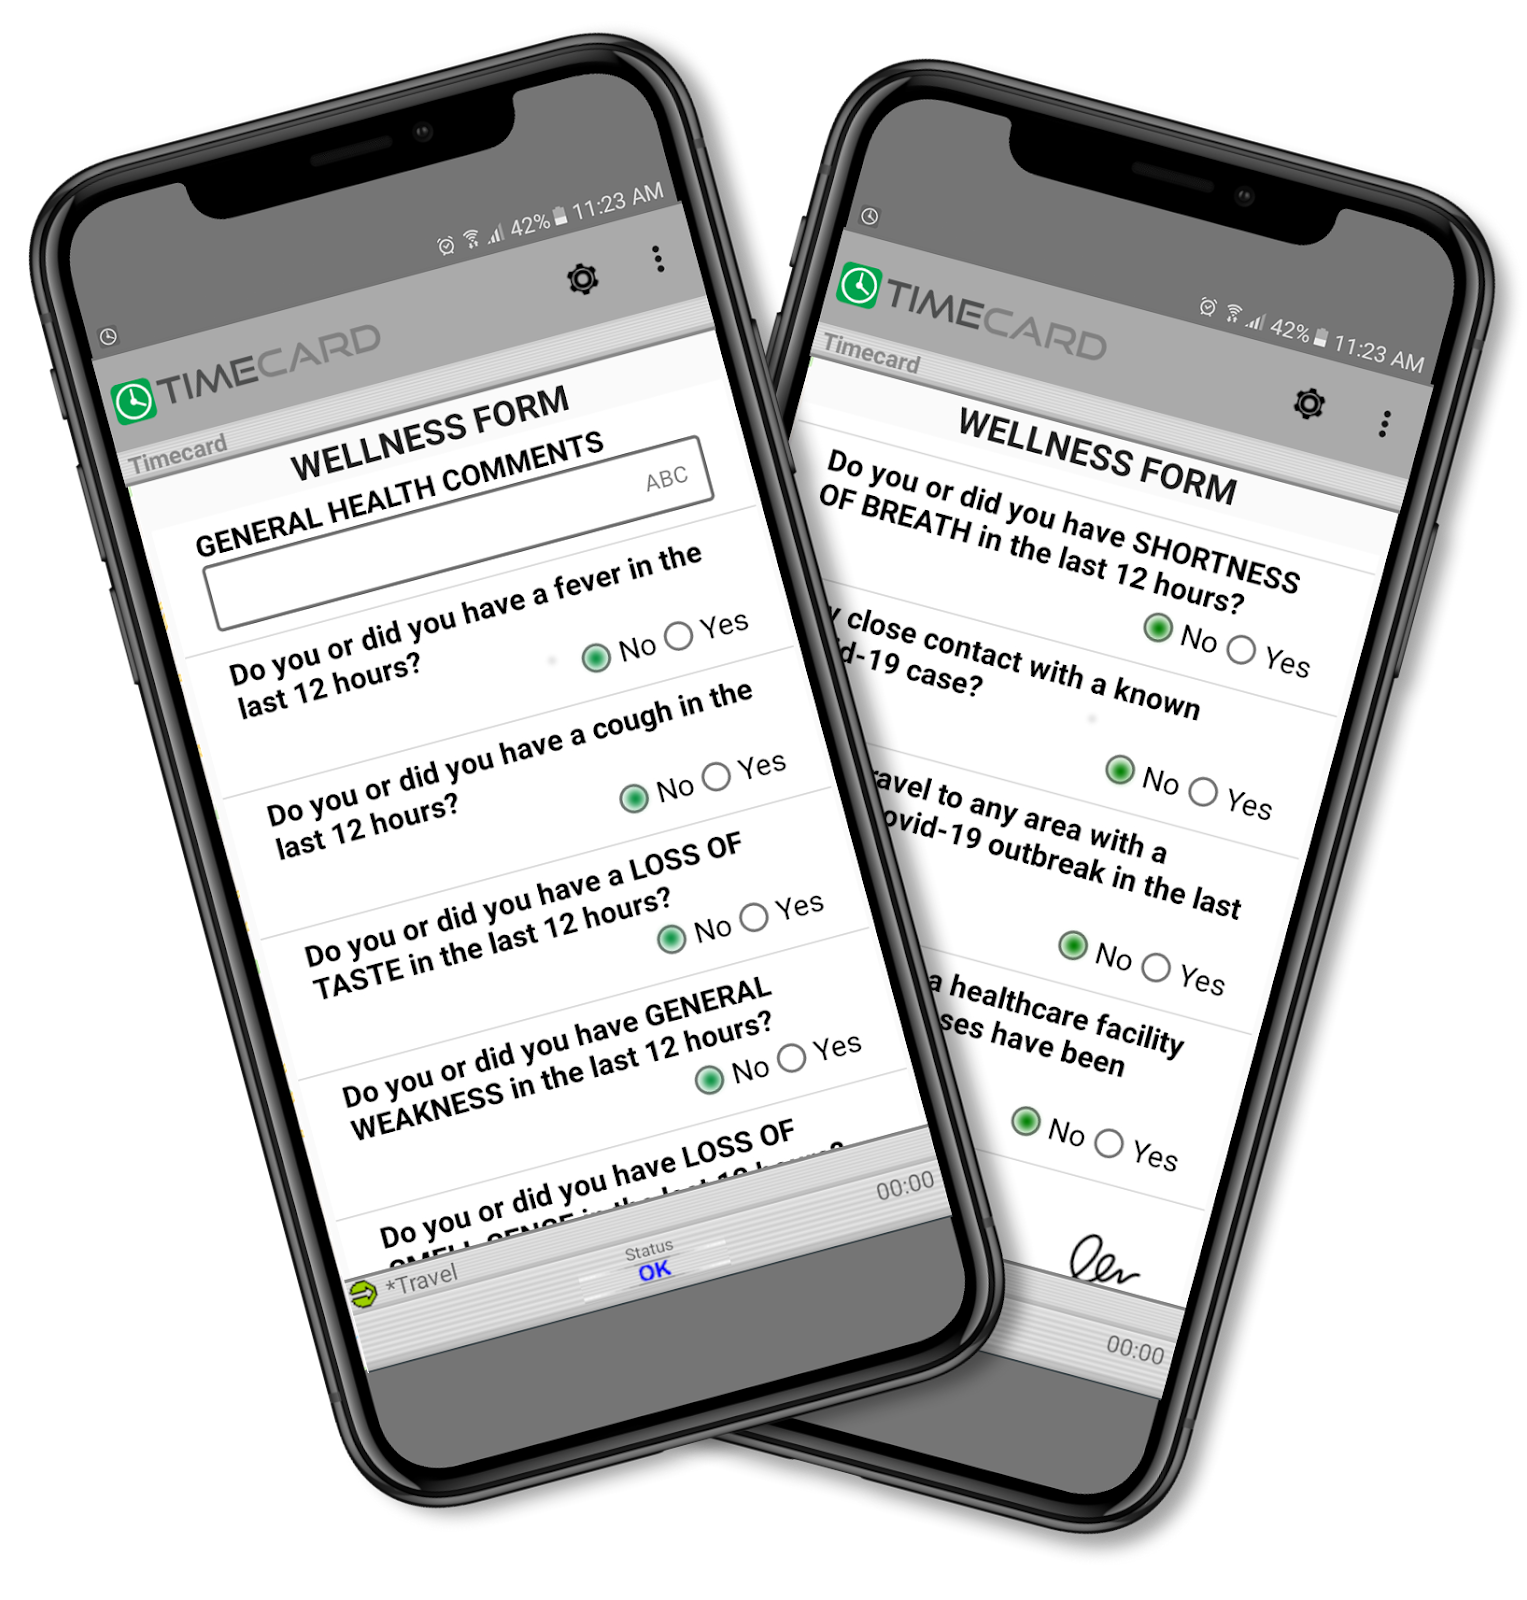
The Forms Only Version is ideal for any type of digital transformation collection, as shown in the following example of our Covid-19 form:


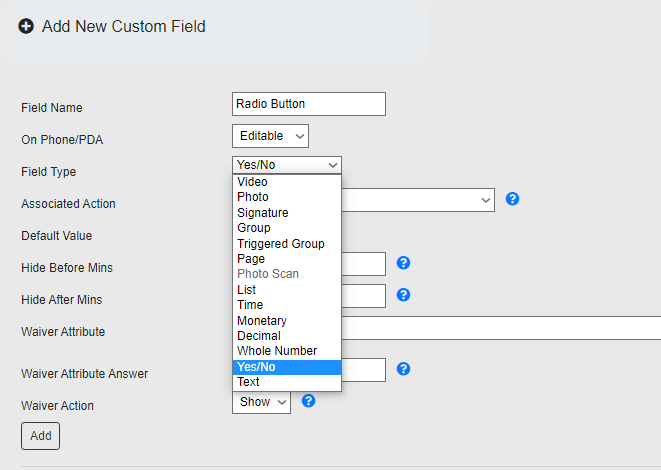
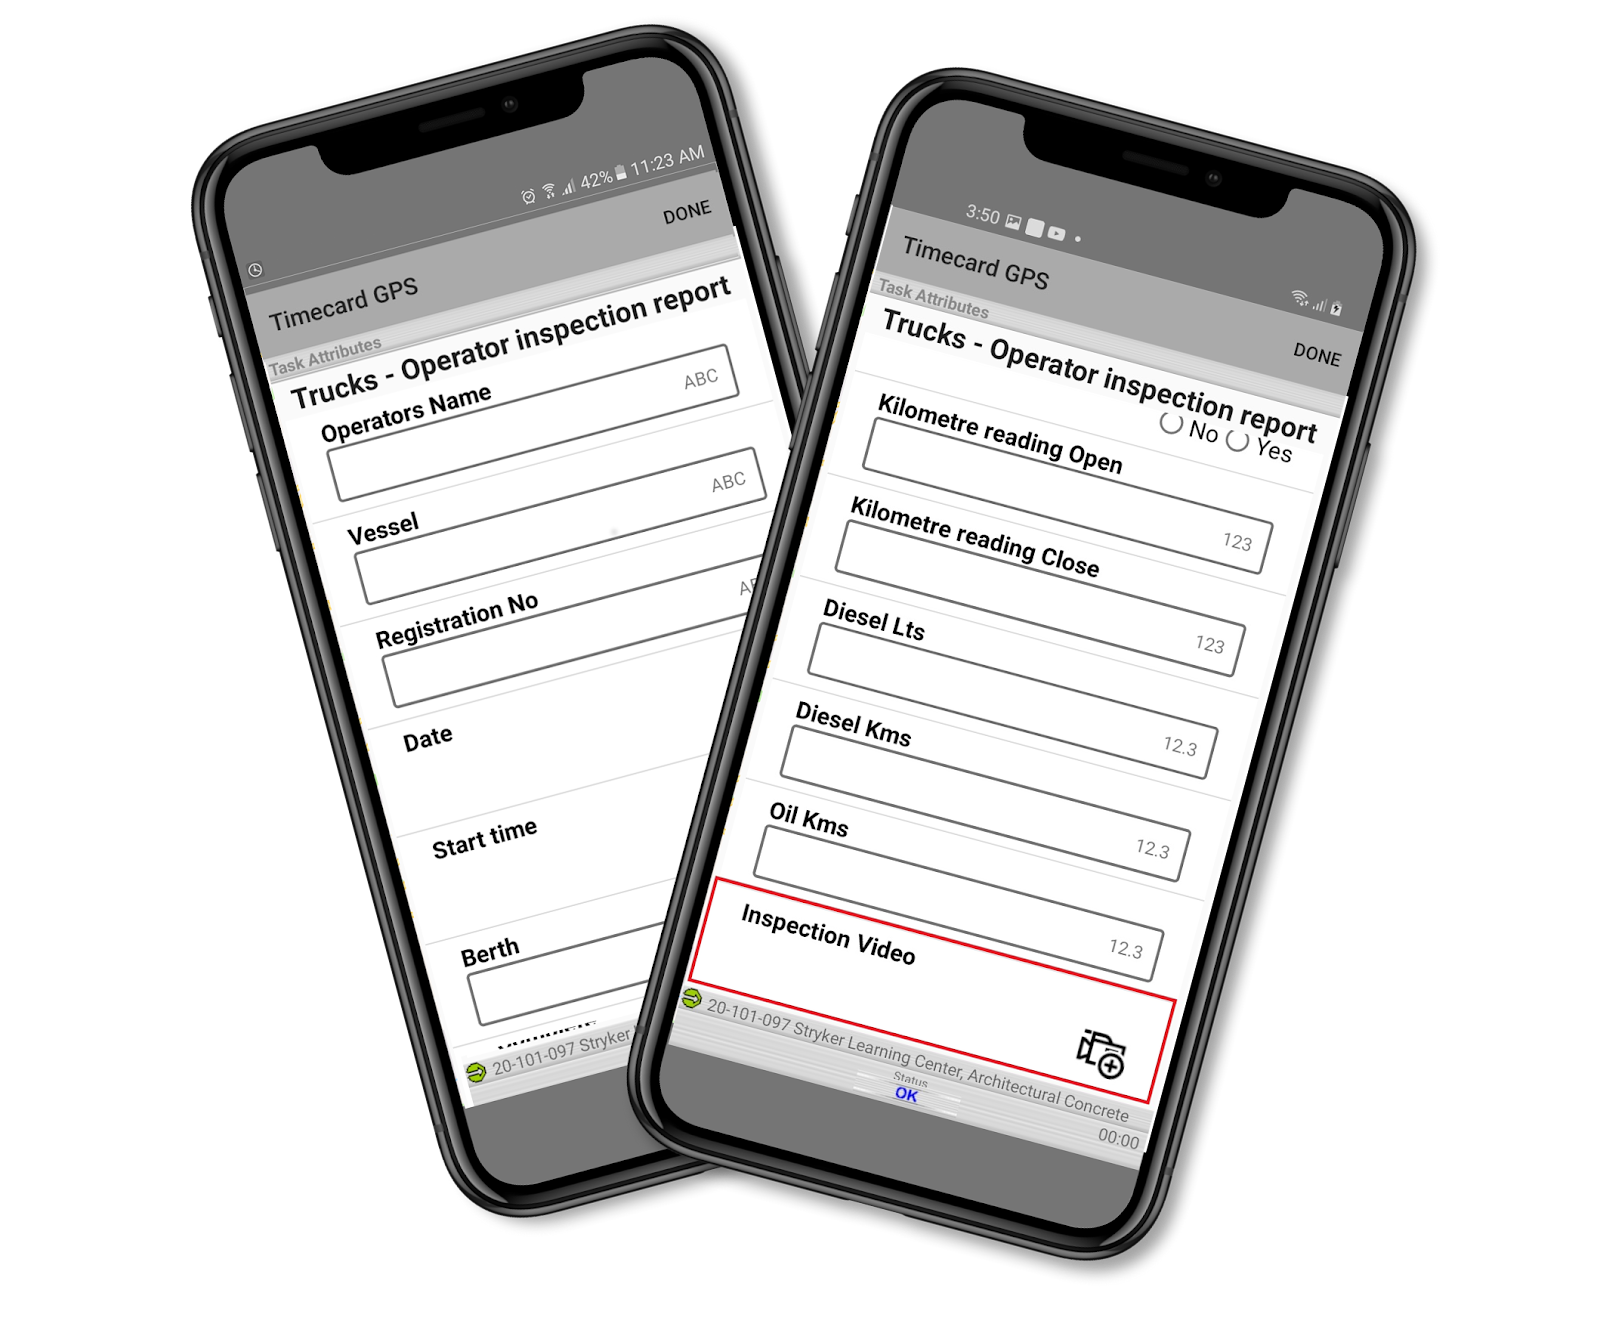
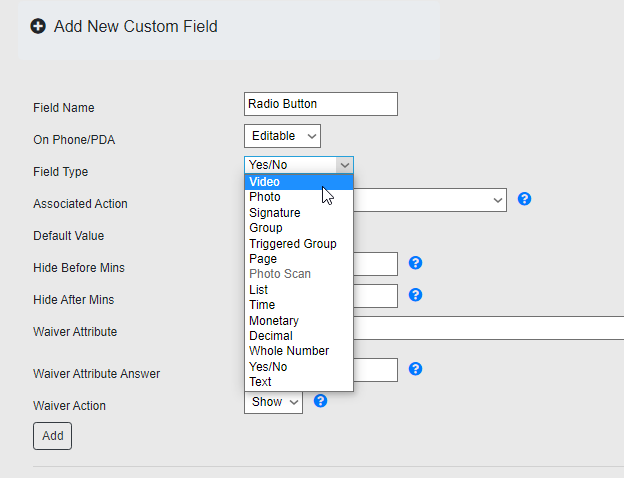
This feature includes Pictures, Videos, Text, Yes/No Questions, Signature Capture, List Selection, Decimals, Whole Numbers and even Monetary Values, among a variety of custom fields that you can add to the forms in order to collect the right data to make important business decisions.


To enable this functionality, all you need to do is follow the usual steps when creating a Field Worker, that is, going to the Field Workers tab and in this case, selecting "TimeCard Forms Only" as the Device Type. Then you'd enter the Device ID, Name, select "Field Worker" as the User Type, choose the appropriate time zone and set and confirm a Password. Once that is done, click on Add New at the bottom. 


When setting up the device , the interface will be that one of the Forms Only Version, no clock in or out buttons for this one ,you will be able to go straight to the Forms!


If you are interested in this forms-only application version please contact us so we can provide you with more information on how you can implement this for your company.


--Econz Team

Thursday, October 29, 2020

Dynamic Table Feature included on Forms

We are very proud to announce a wonderful new feature that gives our application an edge over the competition, we call it Dynamic Table on Forms.

Our Dynamic Table feature now enables a field worker to access additional information when completing a custom form/survey on a mobile device.

This new feature was created to allow field workers access to extra database information that can be loaded into the Timecard system’s form, directly as a CSV File.

To explain better how it works, take a look at the following table: 

The employee would select the "Order ID", then the application would fill out the rest of the fields automatically. This is particularly useful if you have a set of inventory items with predefined values or parameters and you don't need your staff to enter everything manually all the time. The dynamic table can provide information such as available products in the warehouse with codes and descriptions, a List of Work Orders with customer names, address, phone numbers, etc.

In this example, selecting any of the Order IDs would also grab the information for Name, Price, Quantity and Total, and show them as their own custom fields in any of the Custom Field Reports.  

This was designed not only to show the information back to the workers but also to use it as a selection and show this in our reports information.

Setting it up is very easy, just follow the usual Custom Field steps and select the Field Type called "Dynamic Table". Here is where you can click on "Browse" and upload the CSV file. Click on "Read Table" and then you can save the new field.


We made sure to make this into a convenient way to show and retrieve important information that is key for your business, we hope you take full advantage of this great feature that is included in our Timecard GPS package.


--Econz Team

Tuesday, October 20, 2020

Timecard Supervisor Timesheet Approval

Today we are glad to inform you that we have included a host of new enhancements to our Timecard Supervisor Application, which will enable Team Leaders to not only monitor their staff, but also approve Timesheets without the need to go to the Web Portal, all directly from the mobile app!

Let's go over each of them:


Review Employee Activity


Just by swiping from right to left on the screen, supervisors will be able to see the list of employees that have been assigned to them, as well as the last job, task, cost code or activity that was selected with Timecard GPS, along with the date and time for that specific entry.


Inspect Employee Location and Movement with Breadcrumb Trails


Starting from the Employee Task screen described previously, swipe again from right to left and you will be taken to the map screen, where you will see the employees' breadcrumb trails using Google Maps functionality.


Approve Timesheets:


Supervisors will now be able to perform an expedited timesheet approval right from the mobile app! This includes reviewing timesheets, approving and/or rejecting them and making edits if required. We will cover this specific functionality in a future step-by-step post.


The Timecard supervisor comes with all the features included in our Timecard GPS application plus the aforementioned Supervisor features, which means that a supervisor can collect punches, gather job pertaining data using Custom Fields and Forms while at the same time being able to monitor staff workers from the same application all through their mobile device.

Let us know in case you have any questions or comments.


--Econz Team

Wednesday, September 16, 2020

Two New Forms Feature Improvements: Video Capture and Radio Button

We are excited to announce that we have been working on some improvements to the forms features given feedback from our existing customers. These enhancements include the ability to now record a 30-second Video inside the form and being able to see Radio Buttons for answers based on Yes/No questions.


Radio Buttons

Given more and more of our customers are using our solution for Covid-19 Self-Assessment Surveys, the radio buttons from the custom fields is a new “customer favorite” as this feature allows field workers to answer Yes/No questions quickly and in a more convenient way.


Here’s an example view from the Wellness Form: 


The first step to enable this feature is to go to the Basic section in the Administration tab and selecting "Preferences". Find the option called "Render Yes/No field as radio buttons" and tick the checkbox as follows:


Scroll to the bottom and click on "Save" to apply the changes. Next, in the same "Basic" section, go to "Manage Custom Fields/Forms". Here make sure to select the Field Type "Yes/No" when creating the new Custom Field and click on Add. The process here is the same as always, to learn more about it, we have an article dedicated to working with Forms:


30 Seconds Video

This feature gives the field user the capability to take a 30-second video inside a form to document customer visits or important things happening on the field.


To create a Video Custom Field, the steps are the exact same as described in the previous point, that is, going to the "Manage Custom Fields/Forms" section and adding a new field in a form. In this case, make sure to select the Field Type called "Video" and click on "Add" once you are ready:


That's it for now! We hope you take advantage of these incredible new features, be on the lookout for new things that will be coming up.


--Econz Team 


Friday, June 5, 2020

COVID-19 Self-Assessment Form/Survey


During these challenging times, Econz Wireless has been assisting our customers with creating their own COVID-19 Self-Assessment Forms/Survey questions and PDF output. The idea behind this is to provide employers the necessary tools to document and keep track of their staff's health, and then take decisions according to the information provided by the field collaborators.

When using the COVID-19 Self-Assessment questions, the forms are set as required to be completed prior to clocking in or starting the shift. Below are a few examples of the type of questions that can be asked to your field employees:


The COVID-19 Self-Assessment features includes: 

  1. Required questions and digital signature to be completed prior to the field employee’s start of their shift.
  2. Real-time alerts when questions require managers/supervisors to be notified.
  3. Custom PDF output with company logo and digital signatures.
  4. Schedule PDF  to be sent to Managers/Supervisors/HR Directors daily, weekly or as needed.


If you wish to learn how this can be setup, make sure to check out our post on creating Custom Forms/Surveys.

Please reach out to our Customer Support Team in case you had any additional questions.

Until next time!


--Econz Team


Wednesday, March 4, 2020

"Timesheet Report With Totals"

We have just released a brand new report called "Timesheet Report With Totals"!

The main purpose for this one is to be able to view Tasks and Sub-Tasks sorted by date, as well as total day time, overtime and double time. This report also includes any breaks or meals that were taken while on a specific task and something worthy of pointing out, is that it will also tell you the specific day of the week for each task.

Here is a sample of this report:

(Click on image to enlarge)

This report includes CSV and PDF exports, as well as some upcoming editing features that we'll be talking about in a future blog post.

We hope you like it!


--Econz Team

Wednesday, February 26, 2020

Enhanced Functionality for Auto Task Changes

We have recently added an enhancement to the GPS Auto Task Change functionality where the application will determine if the user has been inside the area for a specific period of time. This can be very useful in cases where the auto task change does not need to be triggered immediately, for example, if the employee is just driving by the area.

To set this up, it's easier to add this rule to the Default SmartFence and apply it to all the tasks but of course, it can also be done per task individually. In this example, we'll use the Default SmartFence.

Go to the Administration tab and select "Rules, Action and Fences" in the Advanced section:


Next, select "Manage SmartFences":


Click to "Edit" the Default SmartFence:


Once inside the Default Fence, set the radius to the desired size and click on "Create New" within the Rules section:


On the following screen is where you will select the rule called "Inside Area for at least"; here we have set it to 3 minutes. This means that once the employee has entered the area, the app will start counting time and if it reaches the 3 minutes, then the task will be changed to what we setup in the next step:


Once this is done, click on "Create New Action" at the bottom:


Then, tick the "Automatic Field Device Event" option and select "Change Task" in the Event Type dropdown menu. Doing this will change the employee to the task of the area they are standing in for at least 3 minutes. If you wanted to change to a specific task, then you can tick the Set Task Info option to pick the specific task that you wish the employee to be changed to:


From here on, you can save it until you are back at the first screen (where you specify the radius). Here you have to click on "Add Existing" to apply the newly created rule to the default fence:


After this, the rule will be saved successfully!


If you have any questions, make sure to ask us in the comments section!


--Econz Team

Wednesday, February 12, 2020

New Feature: Loading Users to Checker with CSV Files

We have just introduced a new feature which will help a lot of companies to manage employees that are using Timecard Checker.

With this, you will be able to load users to a tablet and assign them a PIN number all through the web portal in a couple of simple steps, which will be a real time saver when you are dealing with long list of users that share the same device and need to be setup.

These are the steps:

1. Click on the ID of the Checker Owner device (the device ID that is used to setup the phone or tablet to enable the kiosk functionality):


2. Once inside the profile, click on "Update Checker Users":


3. On the next screen, you will find the option to upload users with a CSV file, so make sure to click on that button to continue:


4. Here is a sample of what is required, as you can see, it's pretty simple! All you need is the users' device IDs in column A, and the PIN numbers for each in column B (of course, these need to be existing users that have already been added to the system):


5. Then you will be prompted to look for the file after clicking the "Choose File" button. Once you find it, you can click on "Upload":

(Click on image to enlarge)

6. If everything is OK, you will get a confirmation screen similar to this one:

(Click on image to enlarge)

7. After this, the device can be setup (or do Menu/Connect in case you are just adding new users). Doing the setup following this guide also has the benefit that the employees will be automatically setup, so there won't be any need for each person to confirm their password and enter a PIN number. They will be ready to clock right in without any additional input!


8. Once the users are added to the tablet, you will notice that once you access the checker owner's profile again (in this case, "Warehouse Tablet #02" as seen in step 1),  the system will provide a list of all the users that were added to the tablet along with the assigned PIN numbers:

(Click on image to enlarge)

We are very happy to provide these quality of life improvements, we are very confident that this will improve your company's productivity exponentially!


--Econz Team

Wednesday, February 5, 2020

Improved Password Security Settings

We have just created a new section where you will be able to increase your password security, for this you will need to go to the Administration tab and select "Set Password Rules" in the Advanced section:


Inside this section you will find several different options, the first two are the weak and medium security settings:


Weak Passwords allows to create passwords of at least 4 characters and no further restrictions. With Medium Secure Passwords the password length required will be increased to 8 characters and also no other restrictions.

If you are looking to implement something much more strict and specific, you will be able to use "Custom Security":


The following are the different optional settings you can enable:

  • Minimum Length: set to minimum number of required characters, anywhere between 8 and 32.
  • Has Number?: set it so that at least 1 number is required.
  • Has Capitals?: this will enforce that at least 1 letter in upper case is used.
  • Has Symbols?: this will force the user to use at least 1 non alphanumeric symbol.
  • Restrict Consecutive Characters: prevents the user from setting the password with consecutive characters or numbers, for example "abcd" or "6789".
  • Restrict Repeat Characters: prevents the use of repeated characters, for example "bbb" or "888".
  • Restrict Dictionary Words: restricts the usage of dictionary words.
  • Prevent Historical Passwords: here you can specify if you don't want to allow previous passwords to be used. You can set it from 0 (disabled) up to 10 previous passwords.
  • Expiry Months: this will make the password expire after the specified amount of months and can be done between 0 and 24 in intervals of 3 months.
Please keep in mind that not every single setting is required for the custom security, please make sure to use the options according to your needs. If you were using an integration that required secure passwords, make sure to double check with the proper documentation to ensure that you will enable the appropriate options.

Let us know in case you have any question or comment.

Until next time!


--Econz Team

Wednesday, January 22, 2020

Worker Monitoring Rules, Part 3: No Clock Out In


Happy New Year to everyone! We are very glad to have you as part of the Econz family for all these years. It is because of you that we always strive for excellence in order to give you the best application for your business.

To start this year, we are going to continue with our Meal Enforcement series, this is part 3, and the topic is the “No Clock Out In” rule.

In Part 1 we had already gone over creating the policy (naming the rule and assigning employees) and the action (email and notification alerts), then in Part 2 we started going over the different rules.

The rule we are covering today is pretty straightforward, all you need to do is name it and set the number of minutes after which the employees will get the notification:


Keep in mind that if you had set some rules to deduct breaks from the total hours, then this will affect the moment when the alerts will be triggered, since it will use total worked hours instead of just the hours exactly after the employee clocked in.

Stay tuned for Part 4 coming soon!


--Econz Team