Friday, January 14, 2022

Covid Answers Report

As we have discussed before, COVID-19 has come to turn everything on its head, and all of us as businesses have had to adapt to continue as normally as possible. Econz Wireless has been looking for ways to incorporate this to our application to make your life easier at the same time we strive to keep you and your staff members safe by providing a way to fill out Employee Self Assessment Forms.

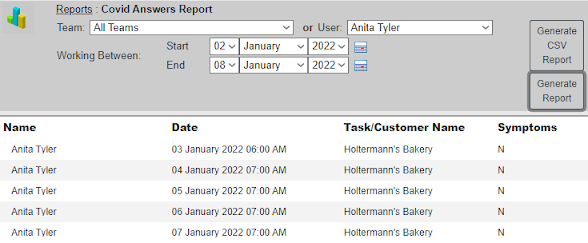
Today, we want to show you the new "Covid Answers Report" which will complement the data captured related to the COVID-19 form and will tell you if the employee has had any symptoms or not without the need to check anywhere else. For that reason, when creating this form, make sure to phrase the questions so that answering "Yes" will mean that the employee has experienced a COVID-19 symptom or been in possible contact with it.

Here is a sample of the Form  so you get a better idea of what it could look like and create your own:

Field Name

On Device

Field Type

Are you experiencing symptoms of COVID-19 (fever, cough, difficulty breathing)?

Required

Yes/No

Have you had contact with anyone who has symptoms of COVID-19, or tested positive for COVID-19?

Required

Yes/No

Have you or someone you have had contact with travelled or returned to [your country] from any destination within the past 14 days?

Required

Yes/No

Has any person in your household, or with whom you have close contact, been required to self-isolate due to possible COVID-19 exposure?

Required

Yes/No

Are you experiencing (sore throat, trouble swallowing, runny nose / stuffy nose or nasal congestion)?

Required

Yes/No

Are you experiencing (decrease or loss of smell or taste, nausea, vomiting, diarrhea, abdominal pain, not feeling well, extreme tiredness, sore muscles)?

Required

Yes/No

Are you on any medication that may impair your operation of a vehicle or equipment?

Required

Yes/No


After an employee fills out the form, then the report can be generated to view the simplified answers. Check out this example for an employee's week:


That's all for now, stay tuned for more news and exciting updated!


--Econz Team

Wednesday, January 5, 2022

RUN Powered by ADP® Integration

Continuing with the series of posts related to integrations, we come today to talk about RUN Powered by ADP®. This post will start by going over the preliminary steps prior to approving timesheets in the Timecard web portal and sending them to RUN Powered by ADP®.

First, we go to the Administration tab and select “Map ADP paycodes to Timecard Tasks”. Then we select the appropriate Company and make sure that the rest of the values are configured properly to match the codes in RUN Powered by ADP® as shown in the example below. Notice how each of the possible code options have a brief explanation as to what they are meant for. With this completed, we are ready to start approving timesheets!

Click on image to enlarge

Let’s continue with the Timesheet Approval process, which means that each of the listed employees in the Approve Timesheets section has already acknowledged, reviewed and signed their own timesheets. We need to make sure to log in as a proper user type with access to this functionality. So we go to the Administration tab and select "Approve Timesheets":


On the next screen, we use the filters to focus on a specific date range, team and/or user and click the "Filter" button:

Click on image to enlarge

And then we click on the ID of the timesheet we wish to review.


The next screen will show us more details of the individual timesheet so we can check them and make any adjustments if necessary.

Click on image to enlarge

Once ready, we click the "Save" button:


Then we will get a confirmation screen, make sure to click on "Save Changes" to complete the timesheet approval:


After the timesheets have been approved, the final step is to send them as a batch to ADP RUN; for this, we go to the Administration tab and select “Submit Timesheets for ADP Payroll Batch”.


Next, we have to select the appropriate Payroll Group and Period, then click on Filter:


The system will proceed with loading all of the timesheets that have been approved for the period and send them to RUN Powered by ADP®:

Click on image to enlarge

Following that step, we scroll to the bottom of the screen and enter the PayData Batch Code in the Batch Number, then click on Save.


Make sure to allow just a few seconds for the system to review the data and send it to RUN Powered by ADP®; once the process is done, we will get a confirmation message that the batch was successfully created. Otherwise, you could get an error depending on if something may be missing in the setup. Here is how it would look like when successfully completed:


RUN Powered by ADP® will finally show the timesheets as follows:

Click on image to enlarge

That is all for now, make sure to ask us in the comments section below or our Customer Support team in case you wish to learn more!

Until next time...


--Econz Team