Friday, January 20, 2023

New Multi Timesheet Approval Functionality

Hello everyone! We are very pleased to show you a brand new feature we have just deployed called "Multi Timesheet Approval". It's an enhanced method to review and approve timesheets for your staff, where you will be able to easily visualize and approve multiple timesheets in one go.

To find this feature, we would go to the Administration tab, then within the "Basic" section you will find "Multi Timesheet Approval":


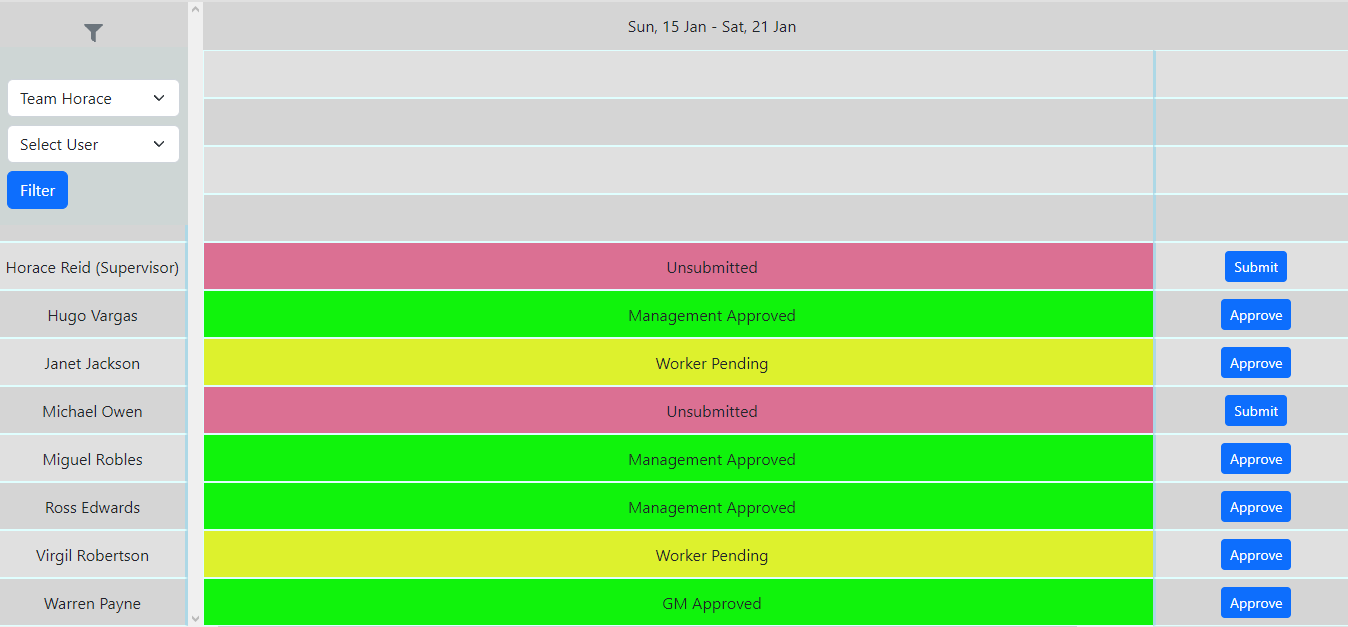
Once inside, you can view all the timesheets for the entire company at once, or use the filters to focus on a specific team or user:


We will filter the screen to visualize just one team for this example, so we pick it from the dropdown menu and click the "Filter" button. You will be able to use the left and right arrows on top of the screen to go back and forward the different timesheet periods. So, here is our current team view:

(Click on image to enlarge)

Notice the different colors depending on the status of the timesheet. We have "Unsubmitted" in red, next stage is "Worker Pending" in green, and finally "Management Approved" or "GM Approved" depending on the settings of your account.

When you click on the status of any users, you will be able to perform a number of different operations:


First up is "Show Details"; clicking this will give you a quick view of the user's timesheet:

(Click on image to enlarge)

Then, we have "Show Full Details", which as indicated, will open a new tab. This is the equivalent of going to the Administration tab, then selecting "Approve Timesheets" and filtering by the date and user... You can start seeing how much time you will save by using this!

(Click on image to enlarge)

The next option is "Edit". This is one of our favorite new features since it will pop up a new style of editing screen right from the same timesheet approval section.

(Click on image to enlarge)

Finally, we have the "Submit Timesheet" button. What this does is that it moves the approval process forward going by the steps described above, that is from Unsubmitted to Worker Pending:


And using the "Submit Timesheet" option from this status, will take you to the final stage, showing the timesheet as approved. Note that you can also use the "Approve" button on the right to perform the same function:


That's all for this time, we will be back with more awesome news for you!


--Econz Team 

Friday, January 13, 2023

Update to Managing Leave Requests as an Administrator

Following up with our previous post about requesting PTO, today we will see how it works from the Administration Portal. Before getting started, you need to make sure to assign an Administrator user to manage each employee's leave requests. This is done by going to the Administration tab and selecting "Manage Users" within the Staff section:


Then, find the name of the employee and click on the ID:


Scroll to the bottom of the screen and find the "Leave Administrator" section. Use the dropdown menu to assign a Leave Admin, then click on Add. After that, click the "Update" button at the bottom:


With that out of the way, let's see what it looks like if an employee sent a Leave Request. We would go to the Administration tab and click "Manage Leave Applications", also on the Staff section:


Here you can see and manage any Leave Requests that need to be reviewed. In this example, we can see a new request that needs to be checked, sent by Randy Howard. You can tell it's new since it has the "Approve" and "Reject" buttons. Note that its status is "Pending" and it even has an attachment that can be downloaded, in case the employee sent any with the request:

(Click on image to enlarge)

If you were to reject it, just click on "Reject" and type the reason for rejection, which will be shown to the employee with a notification within the app. Otherwise, click "Approve" and the system will immediately send a message to the device of the requesting user, just like we saw on our previous post about PTO.

In case you had any staff that does not have the mobile application, or for any reason misplaced the device, you can add a Leave Request in their stead. Notice the "Add New" button on the top of this same screen:


You will be taken to the next screen:


Here you will select the appropriate information for the employee, leave type, start and end times, as well as a comment for the request. Here is an example of us requesting Sick Leave for a staff member:


And if we went back to the Manage Leave Applications section, we would see this request:

(Click on image to enlarge)

That's it for now, let us know if you have any questions or comments about this important and powerful feature!


--Econz Team

Friday, January 6, 2023

Requesting PTO (Vacation and Sick Time) with the Timecard Application

Hello everyone, today we want to tell you about how you can request different types of PTO with Timecard GPS. Today we will focus on the application side of the equation, but on an upcoming post, we will talk about how to use this feature on the Administration side. Whether it's Vacation, Holiday or Sick Leave that you need to request, we have it all, so let's get to it!

The process is pretty intuitive, as you will see... First we start off the Home Screen and open the Menu on the top right.


Then, select the "Manage Schedule" Option:


You will then see two different options called "Schedule" and "Leave Forms". We will talk about the Schedule on an upcoming post, for now, let's stick to "Leave Forms":


On the next screen you will see different options, so you can specify which type of leave you need to request, be it Vacation, Holiday or Sick Leave:


In this example, we want to request Vacation Leave, so we pick that option, then adjust the start and end times and add a note, if needed, then tap "SUBMIT" on the top right of the screen:


We will get a confirmation message, so we select submit again. This will send the request to the server so a Manager can review it:


After that, it comes down to approving or rejecting the request from the Administrator Portal (stay tuned for the next post where you will learn exactly how to do that...), and finally, the employee will receive a confirmation message of the final status of this request:


That's pretty much it! As promised, it's very easy and intuitive to use; let's meet on the next post so you can learn the other side of the coin, what the Managers do on their end.


Until next time,


--Econz Team