Friday, April 30, 2021

Editing Values for Existing Custom Fields

Today's topic will go over the ability to edit values for existing custom fields. This is incredibly useful if you want to make some adjustments to already created forms without the need to delete and add a field.

In this example, we have a form that our company uses to gather details about our customers, notice that we have the fields called "Customer Plan" and "VIP Customer?". With the current setup, employees need to select the plan the customer has and then at the end of the form, answer if they are VIP or not:


When we see in detail this "Customer Plan" field, we can see the four tiers, depending on the plan that our example customer has, "Bronze", "Silver", "Gold", "Platinum":


Our "VIP Customer?" field is also pretty simple, just a Yes/No question so that a Manager can check on a report and handle it as they see fit:


Nothing too fancy here, it just works... But what if we wanted to make it more interesting and more productive? Well, here is where editing values for existing custom fields would come in. We want to make this "VIP Customer?" field shown only for Platinum customers, since it is a bit redundant having to fill that every time. Not only that, but to save time for our Manager, we want to send an automated email every time one of our employees has completed a job for a VIP customer so that we can send a thank you note and a care package. We want to make our top customers happy, of course!

For this, we just need to go to "Rules, Action and Fences" in the Administration tab, then Customer Service, Manage Action and "Add New Action":


Here we can create our notification which will be added to our existing custom field:


Then, we can go back to the form where the "VIP Customer?" field was on and add the Associated Action we just created, called "VIP Customer Notification". Then, to make this question show up only if we selected a Platinum Customer Plan, we change the Waiver Attribute to "Customer Plan", to point it to that specific field, and then we type "Platinum" in the Waiver Attribute Answer to use it as the answer that will make this field be shown in the application, then click on "Save":


You will notice that our "VIP Customer?" field will now have the "VIP Customer Notification" in the "Associated Action" field, which used to be blank before making our changes, all without the need to delete and add any fields:


This is a very powerful tool that can be taken advantage of with a bit of creativity, for any questions or ideas on how you could use this, leave us a comment below.


--Econz Team

Friday, April 23, 2021

Uploading SmartFences with a CSV File

We have a wonderful new feature we would like to share with you today: the ability to upload SmartFences by using a CSV file! This is particularly useful to companies that need to work with multiple Geo Fences and wish to do it quickly instead of adding them manually one by one.

The steps to create them are very similar to how you would create a new fence. First, go to the Administration tab and select "Rules, Action and Fences" from the Advanced section:


Then, click on "Manage SmartFences":


Click on the "Upload Smart Fence CSV File" button:


After that, you will be taken to the Upload screen. Take a moment to look at the sample file:


Notice how there are two different options in the "Fence Type" column, these are "polygon" and "circular". As you might have guessed, this corresponds to the type of fence that you wish to create, just like doing it manually.

In the case of a circular fence, you must set the radius in column C, specifying the amount of miles the fence should be, then in columns E and F, you need to set the coordinates for what is going to be considered as the center of the circle. Circular fences only need one row in the file to be created.

On the other hand, when using the polygon option, since you need a set of different points in the map to draw the complete shape, then you would use a row using the same name of the fence for each of the dots that will be used to complete the polygon. Make sure to use the map of your choice to gather the coordinates for each of the dots and use these in the CSV file.

Here is a screenshot of the actual CSV file we will be using for this example, notice that our "Area 001" has many rows with the same name in column A, but each has different coordinates in columns E and F. This is due to what we just explained before, all of these correspond to separate dots that will shape up our polygon SmartFence:

(Click on the image to enlarge)

Click on "Choose File" to browse and find the file you wish to upload:

(Click on the image to enlarge)


After selecting the file and clicking on "Open", you will see its name next to the "Choose File" button, all you need to do now is click the "Upload" button:


You will get a confirmation screen prior to completing the upload, this is a good chance to make sure everything is OK before proceeding:

(Click on the image to enlarge)

When you are ready, scroll to the bottom of the screen and click the "Confirm" button:


After that, all the SmartFences in the file will be uploaded:

(Click on the image to enlarge)

To view the wonderful final results, you can click on the ID of the fence, for example, let's check our "Area 002":
(Click on the image to enlarge)

Our system has perfectly created the polygon using the coordinates we provided! From here on, you can work on adding and editing the rules that will take place inside this area, such as "Entering Area", "Leaving Area", "Clock-in Lock" or any of the other available rules.

That's it for now, stay in tune for more exciting news!


--Econz Team

Wednesday, April 21, 2021

Using a CSV File to Upload Tasks and Subtasks to Multiple Teams

Hello everyone, today we have a real "greatest hits" for you, with this new feature you will be able to upload all the Tasks and Subtasks to every team you want, all in one upload!

If you know how to upload tasks with a CSV file, you pretty much know all there is to it, but either way, you can follow along with the required steps below. First, go to the Administration tab and select "Maintain Task/Customer List":


Then, you don't even need to select any teams, just open the dropdown menu and select the option "Load full teams, tasks, subtasks from Comma Delimited File":


Here is the screen you will be taken to, notice the sample file is a bit different than the normal task upload. The most important changes are related to the first three columns, "Team", "Task / Customer" "SubTask":

(Click on the image to enlarge)

The idea is that if you have a Task with multiple SubTasks that you wish to upload to a Team, you could say that each SubTask will need its own row specifying what Task it belongs to, as well as the Team that Task corresponds to.

So, to make it easier to understand, let's check the following example:


Team "Office" has one task called "Office Time" with three SubTasks: "Meeting", "Training" and "Regular Hours". Notice how there are three rows, one per SubTasks, and since all of these belong to the "Office Time" Task, then that's the value we repeat in column B. Finally, they all need to be uploaded for the "Office" team, so that's the value we use in column A, as well. Team "Construction" uses the same principle but it has two Tasks, each with its own set of SubTasks.

Click on "Choose File" and browse for the CSV file, then select to either append or replace the tasks and click the "Upload" button:


You will get a message when the system is validating the file to make sure it's the correct format and that it follows the guidelines in the sample image.

If everything is OK, you will get the following confirmation screen:


Make sure to click on "Save" to proceed with the upload. Then, you will see the following screen when the system is uploading the file:


After that, the tasks will be correctly uploaded. This can be confirmed by going back to the "Maintain Task/Customer List" screen and clicking on the Team names:


(Click on the images to enlarge)

It's that easy! We are very happy to talk about this wonderful time saving feature, let us know in case you have any comments or questions down below.


--Econz Team


Updates to the Leave Form

Hello everyone, we are back here with a quick update! This is a topic we had covered before in a couple of previous posts where we discussed the ability of our application to aid employees in requesting vacation and sick days. Originally, we only had Annual Leave and Sick Leave as the available options, but since we are always looking for ways to make our system better, more flexible and efficient for our customers, we have now updated the options available.

First, open the app menu on the top right of the screen and select "Manage Schedule":

Then, you will see the options "Schedule" (which, we will talk about in a future post), and "Leave Forms", which is the one we need to select:

Once inside, you will see three options; “Vacation Leave”, “Holiday Leave” and “Sick Leave”:

The request and approval process is the same as before, but having more specific options allows organizations to be more detailed in their payroll and also for employees to be more concise as to what kind of absence is going to take place.

Keep your eyes open for more exciting future updates!


--Econz Team


Friday, April 16, 2021

Travel Time Deduction

In this post, we are going to show a new feature we are very proud to announce called "Travel Time Deduction". As the name implies, the idea is to provide organizations with a way to automatically deduct the first and last travels of the day, which are usually done by the employee when going to work prior to starting the shift and going back home.

To enable this, go to the Administration tab and find "Travel Settings" within the Integration/Payroll section:


Here is an example of how it could be configured:


(Click on the image to enlarge)

We are going to go over each of the settings:

  • Select which field is used to determine if task is travel: with this setting you can choose whether it's the Task, Subtask or both that are used to determine if the employee was indeed using a travel related task.
  • Select Deduction option: "Deduct If Less Than" is used if the employee should only have time substracted when travelling for less than a specific period of time, if you wish to always take away a default amount of time, use the "Deduct Amount" option.
  • Deduction Minutes:  here you specify the amount of minutes that will be applied to either option you choose from the "Select Deduction option" section.
  • Set Strings to search in the set fields to determine travel: this one is pretty self explanatory, here you would set the string that the system should take into consideration to know that an employee has used a travel task.
When you are ready with the setup, click on "Save" to continue.

Here is an example of how the deduction is done. First, let's take a look at the total hours without any deduction, provided here by the Timecard Task Detail Report:

(Click on the image to enlarge)

The employee has one hour at the beginning of the day, one hour in the middle and four hours at the end. Remember that only the first and last hours are to be substracted, and we set it so that only 45 minutes are removed from each. So, if the employee worked a sum of 8 hours, then with this setup and the specific punches that were used, a total of 1:30 hours should be deducted. Let's take a look at the Timecard Detail Report:

(Click on the image to enlarge)

As you can see, in a panoramic view (as opposed to a task by task detailed view) of the total shift, we see a total of 6:30 hours. This will also be reflected in the employee's timesheet:

(Click on the image to enlarge)

That's all for now, let us know if you have any questions or comments down below!


--Econz Team

Wednesday, April 14, 2021

Timesheet Signoff: General Manager Approval

Some organizations need to have more than one level of approval. Sometimes employees work on multiple projects which are under different managers' supervision and different people need to approve those timesheets. In those cases, it's very likely that there is someone who acts as an overseer of all of the worked projects and this person needs to review and approve all of the timesheets that other Project Managers have approved. We call this user General Manager.

To enable this functionality, go to the Administration tab, specifically the Preferences within the Basic section, then find the option "Enable General Management Timesheet" and proceed to check the box:

Then, to create a General Manager user that can take advantage of this functionality, go back to the Administration tab, but this time, select "Manage Users" inside the Staff section:

The process is pretty simple, just click on the "Add New" button:

Then, set these fields following the example below:

  • User Type: use General Manager.
  • TimeZone: set it to your correct time zone.
  • LoginID: this is the user part of the credentials that the manager will login with.
  • Name: here goes the name of the user.
  • New/Confirm Password: this is the other part of the credentials, make sure to use a secure password for this.
  • Language: make sure to set this to the appropriate language you want the web portal to be displayed with.
Then click the "Add New" button:


The General Manager's role starts once the timesheets have been approved by a Payroll Admin, Operations Manager or any of the other user types that can approve timesheets. In this example, we can confirm that the timesheets have already been reviewed and approved by each of the responsible managers:


Then, the General Manager would log in with the credentials we created earlier and go to the Administration tab. Then select "Approve Timesheets" inside the Basic section:


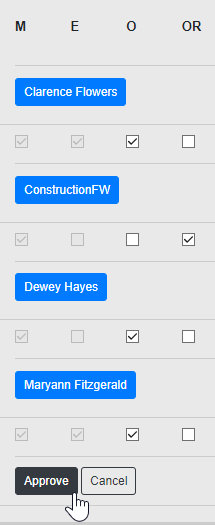
The next screen will show an overall view of all the timesheets as follows:


Notice the first four columns on the left, here is the explanation as to what each of them corresponds to:
  • M: this column will be checked if a Manager has approved the timesheet.
  • E: this one is for when the employee has also approved the timesheet.
  • O: by checking any of these fields, the General Manager will approve a timesheet. Note that this will only be available once both the project manager and employee have approved the timesheets, or if the manager has submitted the timesheet manually on behalf of the employee (Dewey Hayes is the example of this in the screenshot above).
  • OR: this will be used to reject a timesheet.
Once the General Manager has reviewed all the available timesheets, that person can check the appropriate boxes and then click on "Approve" at the bottom to save the changes:


And that should be all! Different dedicated reports such as the Timesheet Report or the Timesheet Event Report will also provide details of the General Manager's involvement in the approval process.

Let us know if you have any questions or comments down below.

Until next time!


--Econz Team

Friday, April 9, 2021

Timecard Supervisor: Timesheet Approval Guide

As stated in one of our previous articles, Timecard Supervisor now has the ability to approve timesheets for employees without the need to log into the web portal. Today we are going to cover step by step how to use it.

First of all, make sure to setup the user type correctly according to this guide, then to get to the stage where the Supervisor will review and approve timesheets, a full payroll period needs to have passed. This means, that employees that need a timesheet approved by the supervisor will have to do punches in the system, then sign their own timesheets and send them for approval at the end of the pay period, you know, business as usual...


Once an employee signs a timesheet, the Supervisor will get a notification that a timesheet is available to be approved by that specific person:


Now for the fun new part, open the Menu by tapping the top right icon, then select "Supervisor Signoff":


Once you do that, you will be taken to the Approval List screen, where a list with all of the available employees and timesheets will be shown:


Notice that some are shown as "unavailable" and some as "pending". Unavailable means that the employee has no timesheets signed to be approved, so of course, the ones that the Supervisor will need to review are the ones with "pending" status.

The Supervisor will see the timesheet for the configured period, in our example we set it to daily timesheets, so we only see one day at a time. We have made improvements to the look and feel to make it not only more attractive but also much clearer to understand with this payroll view, which will show details of each task that was punched during a specific day.

There will be three different options, which should be familiar for all of those who have used the timesheet approval section in the web portal, these are "Reject", "Approve" and "Edit".

"Reject" will be used when the timesheet needs to have some corrections done by another manager, "Approve" means that everything is OK and those hours are good to be paid by Payroll, and finally "Edit" is to be used when the Supervisor is the one in charge of making adjustments to the timesheets. If you tap on "Edit" you will be given the following confirmation message:


Then, you will see the available punches and the edit button next to them, in this example we are correcting the time from 5:45 AM to 6:00 AM:


(Click to enlarge the images)

The foreman will have to provide a reason for which the timesheet was rejected for re-approval to keep it on the record and this will cause the timesheet to be sent back to the employee so that he/she can sign it again and repeat the process until the hours are successfully approved:


If you were to approve a timesheet, just tap on the "Approve" button and confirm in the next message screen:


Doing that will result in the timesheet no longer being in "pending" status:


The application also has the ability to show the History of the timesheets the supervisor has worked on, just tap on "History" on the top right of the screen and that should take you to this section, where you can tap on any of the entries and review the timesheets for that specific individual and day:


That's it for now, let us know if you have any questions below.


--Econz Team