Friday, December 10, 2021

iSolved Bi-Directional Integration

A little while ago we introduced the iSolved Integration Report, which used a CSV export to generate the data that would be later imported into iSolved. Today, we are going to cover how to setup the full fledged bidirectional integration.

The first step is to have our Customer Support team assist with setting up your account and enabling the integration with iSolved. Then, you can go to the Field Workers tab and start pulling your staff members to Econz Timecard. These are the buttons that we will use for this purpose.


When using the "Auto Sync" option, you need to ensure that the integration has been setup with the time zone and the password under the iSolved Integration section, which is done by our Support team. After you click on Auto Sync the system will take you to the Integration logs page in case there are errors with the integration.

Going back to the Field Workers tab, let's now go over the Manual Sync, or the "Sync Workers with iSolved" button on the top right. When you click on it you will be given the option to pull the employee list from iSolved so that you can choose exactly what employees will be enabled in the Field Workers tab. Keep in mind that employees will not be shown there unless they are synchronized individually. Also, you must change the password for the workers in order to sync to the devices.

Just select the Worker Type and Time Zone, tick the checkbox for the users you wish to synchronize, click "Add" and finally click the "Save" button at the bottom of the screen:

Click the image to enlarge

Either way you choose, once successful, the employees will be synced and shown in the Field Workers tab:


Once the employees have worked through their pay periods and approved their timesheets, then a Payroll Manager can jump in, approve the timesheet and after that, they will find an option on the bottom right showing a red X showing that the Timesheet has not been synced:


Click on the circular green arrows to complete the process, you will now see a green check mark showing "Synced with Payroll":


After that, the timesheets will have transferred to iSolved:


Don't hesitate to reach out to us in case you are interested in using this integration or have any inquiries!


--Econz Team

Friday, December 3, 2021

PaySpace Integration

We are very proud to announce that we have implemented a bi-directional integration with PaySpace’s Payroll and HR solution, so now our customers that use that platform will be able to have our system communicate automatically with it.

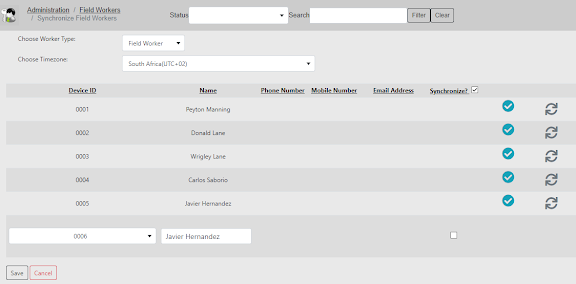
Once the account is created and setup by one of our Support representatives, you will be able to log in and start pulling employees from the PaySpace application. Go to the Field Workers tab and click on the "Sync Workers with PaySpace" button:


You will notice that Timecard has already pulled the Employee List you have from PaySpace and it's making this available so you can choose and pick exactly who is going to be added to Econz.

Click on image to enlarge


You would click on the Synchronize checkbox for the employee you wish to add, specify the Worker Type and Time Zone at the top of the screen, then click on "Save" on the bottom left:

Click on image to enlarge

It's very important to note that when doing the Manual Sync you must change the password for the workers in order to sync to the devices. If there is a conflict with the device ID, you can even customize it before saving it:


If you were to use the "Auto Sync" option instead, make sure that the integration has already been set up with the time zone and the password under the PaySpace Integration section (this will typically be done by our Support team, as well). After you click on Auto Sync the system will take you to the Integration logs page in case there are errors with the integration.

Now comes the moment when employees have already worked through their pay periods and it's time for a manager to approve their signed timesheets. If for any reason an employee is not able to sign their own timesheet, the managers can submit the approval for them, read this previous post to learn how.

As discussed before, in order to have access to the timesheet approval process, you need one of the following user types:
  • Payroll Admin
  • Super Payroll Admin
  • Office Admin
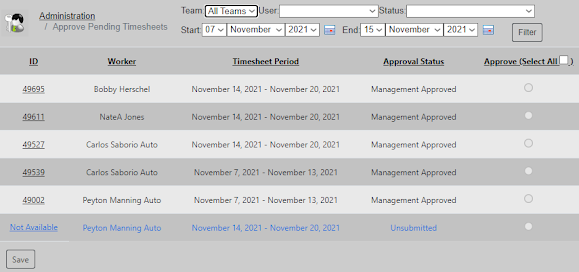
Once logged in, go to the Administration tab and select "Approve Timesheets". Use the filters to focus on the team, employees and date range you desire and click on "Filter". This will bring up the results for the employees who have timesheets during the period you selected:

Click on image to enlarge


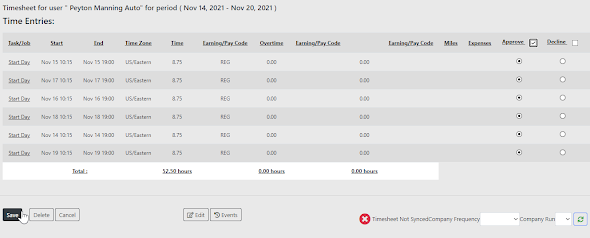
Approve the timesheets as needed, then click the "Save" button on the bottom left:

Click on image to enlarge


Then, to complete the synchronization, set the Frequency to either Weekly or Monthly, depending on your company setup, then choose the Company Run period corresponding to the timesheet you are reviewing. Finally, click the green circular arrows button on the right:


The red X will change to a green check mark and you will now see that the timesheet is successfully "Synched With Payroll".


That's all for now, let us know if you have any questions or comments.

Until next time!


--Econz Team

Friday, November 26, 2021

Editing Addresses on Existing Tasks

Today's post will talk about a new feature that has been added to our web portal, which will enable users to easily edit addresses on existing tasks. Previously, if you added a task to the system, you needed to enter the address details at the moment of uploading or else the task would need to be later replaced if an address were to be added.

Well, not anymore! Here is how you can do this. First, make sure you are logging in as an Administrator user, then go to the Administration tab and select the option called "Maintain Task/Customer List" inside the Basic section:


Then, find the team and job that you wish to edit, in this case, we need to add an address to "Econz Office", found within the Team Horace, so we click on its Task ID:


As you can see, this task has no address yet, but we have a set of text fields we can use for this purpose:


Let's go ahead and add our address for this project, the coordinates will be added automatically once the system detects the correct address. When ready, we click on "Save":


Note that you also edit coordinates only, if so you desire, which is useful for rural properties which don't necessarily have a specific address.


Remember that adding addresses to tasks will allow you to incorporate additional functionality such as a whole plethora of custom rules that make use of the GPS location to triggered different types of alarms.

Let us know in case you have any questions or comments below. Until next time!


--Econz Team

Friday, November 19, 2021

Office Admin Powerful Job Assignment

Hello everyone! We are bringing you a new enhancement for users with the Office Admin profile, normally when editing tasks or user events an Office Admin is constrained to only assigning from within that employee’s teams set of jobs.  This new functionality now optionally allows the ability for them to assign jobs from the set of all possible jobs (i.e. including jobs from other teams).

To enable this, log into the Web Portal as an Administrator user, then go to the Administration tab and click on Preferences. Find the option called "Enable extra Office Admin powers for Edit User Events":

Click on image to enlarge

Make sure to follow this guide to assign teams and users to Office Admins properly, in this case, our Office Admin has Region B only:


These are the current tasks for Region B:


But we know that Rufus Robinson worked with Region E performing the task "Penny Cafeteria", which is not in the list of tasks for Region B. So, here is where the magic comes in. We log in as an Office Admin and go to the "Edit User Events" screen within the Administration tab.

If we wanted to insert a task, we can now search and choose tasks from other teams. As we saw before, "Penny Cafeteria" is not within the jobs available for Region B, but by enabling this functionality, we can now edit that task and add it to his punches:


Here we can see how the task has been successfully added:

Click on image to enlarge

And this also applies to editing tasks:


That's it for this time, stay tuned for more news!


--Econz Team

Friday, November 5, 2021

New Report: California Meal and Rest Report V2

Today we have a quick post to talk about a new report that we have incorporated into our system, the California Meal and Rest Report V2. If that name sounds familiar, it's because we previously had talked about the first version of this report, but this one has a couple additional features, to make the report even more useful.

This image is a big one, make sure to click it to view it better

This report provides the times that the breaks and meal periods were taken, following the order of First Break, First Meal, Second Break, Second Meal, as well as the clock in and out times.

Then, the following columns correspond to the Premium Pay End of Day Questions:

  • Anyone injured?
  • Did you take all breaks today?
  • Premium Pay?
  • Was this meal taken later than allocated at your election?
  • Was this meal taken later than allocated due to work requirements?

Notice how the "End Meal" column has some values in blue? Well, that means that you can click on them to view the signature for when the employee finished the meal before the expected time.

Finally, on the far right side you will see the Signature column, which will enable you to view the clock out signature provided by the staff.

That's it for now! Let us know in case you have any questions or comments down below.


--Econz Team

Friday, October 29, 2021

New Report: iSolved Integration Report

Hello everyone, we are very pleased to share with you the first stage of our integration with the iSolved HCM Workforce Management Solution, always looking to improve our system, add new ways for it to communicate with other systems and help you, our valuable customer, to reach your company goals.

This report requires a bit of additional setup to populate the "Employee #", "Branch" and "Division" columns. First we go to the Administration tab and select "Manage Web Only Custom Fields":


Then, we scroll down to find the "Field Device Custom Fields" section:


And then we add our three fields, "Employee #", "Branch" and "Division". For these you only need to enter the Field Name, and leave the default fields, that is making them editable and text as the field type, then we click "Save" at the bottom:


For each field you will be asked to add it to the existing objects, make sure to select Yes so the employees' profiles are updated with them, as we will fill them out in the next step:


Then, we need to access the Field Worker's tab and update these newly added fields on each profile, according to your company's setup. Note the highlighted fields at the bottom:


Once the setup is complete, we can go to the Reports tab and look for the "iSolved Integration Report" within the "Accounting and Payroll/Integration" section:


And here is the final result once we generate the report:

Click on image to enlarge

That's it for the moment! Stay tuned because this is only the first part, our team is working hard at this moment to bring you something else related to iSolved, but we'll leave that for next time...


--Econz Team

Friday, October 22, 2021

Yes/No Custom Fields: Selecting Response That Triggers an Action

In a previous post, we had talked about editing custom fields and more importantly, adding Actions to use as triggers in Yes/No questions. Well, today we are going to take this a bit further and explain something new that we have implemented to provide even more flexibility.

With this enhancement, you will be able to determine what specific answer will trigger the action. Let's take a look at the action we had previously created called "VIP Customer Notification":


We currently have it so that if we select "Yes", management would get an email notification to send a thank you note and a care package to that customer. That was the default behavior, but what if we wanted to change it to something different like if the customer is not VIP, we want to try to get them to that status?

Let's make a couple of changes to this Action and convert it to a "Potential VIP Customer Notification":


Perfect! With that change out of the way, let's go back to the form and check out what's new. We go down to the "VIP Customer?" Yes/No question field, make sure that the "Potential VIP Customer Notification" action is selected, and then we see a new section called "Field Value to trigger Action". It is set to "Yes" by default, but since we want to be notified if the customer is not in VIP status, we change it to "No":


You can use any of the options depending on the context of the question, the action can be triggered if the answer is "Yes", "No", on either answer, or set it to "None" if you wish to disable the associated action without the need to delete the whole thing, and you can then change that value later to enable it easily.

After making that change, we click "Save" at the bottom and finally we have our updated form:


That's it for today, we hope you like this and get the best out of the new functionality. Tune in next week for more exciting news!


--Econz Team

Friday, October 15, 2021

Timecard Shift Details and Clockout Questions Report V2

We are proud to present to you today one of the newest additions to our list of reports, the "Timecard Shift Details and Clockout Questions Report V2''. This report looks to combine the information provided by the Lunch Delayed Report and the Premium Pay Bad Users Report. Here is a sample of what it looks like for a few days looking at one employee's data:

Click on image to enlarge

This comprehensive report is focused towards Premium Pay information, it provides details following the succession of these events:

  1. Clock In
  2. First Break
  3. First Meal
  4. Second Break
  5. Second Meal
  6. Clock Out

Of course, the staff will collect this information according to the total time they are working and ensuring to comply with their company policies.

Here is a detailed list of the column headers for this report.

  • Name: Name of the employee.
  • Device ID: device ID of that person, used to set up the app on the phone.
  • Date: date of the event.
  • Clock In: time when the employee clocked in/
  • Start Break: time when the employee took the first break of the day.
  • End Break: time when the employee ended the first break of the day.
  • Clock In to First Break Time: time that passed between the moment the employee clocked in and took the first break.
  • Start Meal: time when the employee took the first meal of the day.
  • End Meal: time when the employee ended the first meal of the day.
  • Clock In to First Meal Time: time between the clock in time and the start of the first meal.
  • First Break to Second Break Time: this states how much time passed between the start of the first break and the start of the second break.
  • Start Meal: time when the employee took the second meal of the day, if applicable.
  • End Meal: time when the employee ended the second meal of the day.
  • Start Break: time when the employee took the second break of the day.
  • End Break: time when the employee ended the second break of the day.
  • Clock Out: time when the shift was completed and the worker punched out.
  • Shift Time: total time worked by the employee.
  • Total Meal Time: amount of time spent on meal time.
  • Anyone injured?: starting with this column and all the way to the right, is where we get the answers provided at the end of the day Premium Pay questions, this one is pretty straight forward, just asking if anyone was injured while on shift.
  • Did you take all breaks today?: employees would answer either yes or no, depending on if they took all of their breaks.
  • Did you work over the organisations maximum daily hours?: this one for example, is in case an employee worked over say 12 hours, which would be the maximum set for the company.
  • Was this meal taken later than allocated at your election?: this question is used so that the employee can state that he/she took the meal period after the expected time.
  • Was this meal taken later than allocated due to work requirements?: with this question, the staff members can let management know if work activities were the factor behind the delay of them taking lunch time.
  • Premium Pay?: this is a flag that the system will add automatically, depending on the rules that were configured and the answers provided by the field workers.

Hope that makes it easy to understand, let us know in case you have any questions or comments!


--Econz Team


Friday, October 8, 2021

Setting up Timecard Supervisor

Timecard Supervisor is one of our most important and widely used features. We have talked about it in numerous previous posts, so we thought it would be useful to provide a refresher guide and go back to basics: setting it up!

First we need to create a Field Worker Administrator user; this is done in the Field Workers tab, we would just click on add new, then here is the example of the fields that need to be used:


Here is a brief explanation of what is needed:

  • Device Type: use TimeCard.
  • Device ID: the phone number for the device that the employee will use.
  • Name: name of the user.
  • User Type: to enable the Timecard Supervisor functionality, make sure to only use "Field Worker Administrator".
  • TimeZone: time zone where the employee is located.
  • New/Confirm Password: this is the password that will be used when setting up the application.
  • Enable Timesheet Approval: make sure to enable this if you need that supervisor to approve timesheets.
  • All other settings are optional.
Then click on Add New at the bottom to continue.

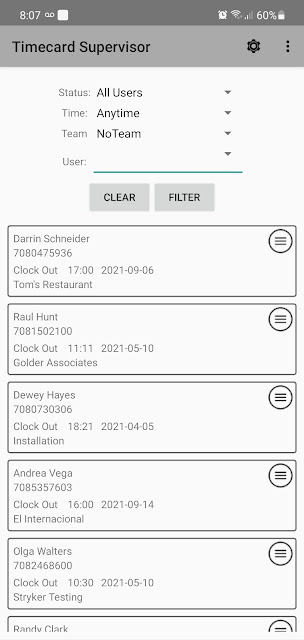
Before setting up the application, there is one more very important step that needs to be done. Since we are obviously talking about Timecard Supervisor, here is where the supervisor part would start showing its face, we need to create a team for this user and add the employees that he/she will be in charge of. If this step is omitted then this person won't be able to filter punches, view breadcrumbs or approve timesheets for anyone, so let's make sure to create a team and add some users for "Horace Reid" to monitor.

Iin the same Field Workers tab we will click on the "Manage Teams" button, and then on "Add New Team":


Then we create the team, we can name as we wish and select that person as the supervisor, then click the "Add New Team" button:


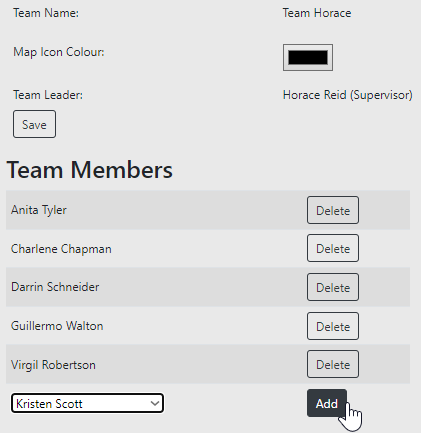
Once that step is done, we will be able to add employees to our new team by using the dropdown menu. Staff members that are already supervisors for other teams are not available to be added, so keep that in mind:


Now we can download the application, just search for "econz" in Google Play Store or the Apple App Store and find "Timecard Supervisor" with the red icon, then tap "Install":


Once the app is installed, launch it and make sure to allow all the required permissions for proper functioning of the software:


Next, you will be prompted to enter the Device ID and Password, which are the ones we created earlier when setting up the profile:


Once the connection with the server is successful, we will get a disclaimer which has to be accepted to continue:


You will get a green thumbs up and a number of popup messages notifying you about the progress of the application loading all the data for the profile that was configured:


Then, you will be asked to allow GPS based permissions, this step is also really important to ensure proper tracking while using Timecard Supervisor:


After that, the installation is completed. We can use it to clock in and out as normal, all the functionality that the full version of Timecard GPS has, as well as the features unique to Timecard Supervisor, such as viewing employees tasks and breadcrumb trails or sending messages:


And also, using the Timesheet Approval functionality, which we talk about in a previous post:


That's it for now, we hope you find this guide useful, if you have any questions, leave us a comment below!


--Econz Team