Showing posts with label forms. Show all posts

Friday, April 30, 2021

Editing Values for Existing Custom Fields

Today's topic will go over the ability to edit values for existing custom fields. This is incredibly useful if you want to make some adjustments to already created forms without the need to delete and add a field.

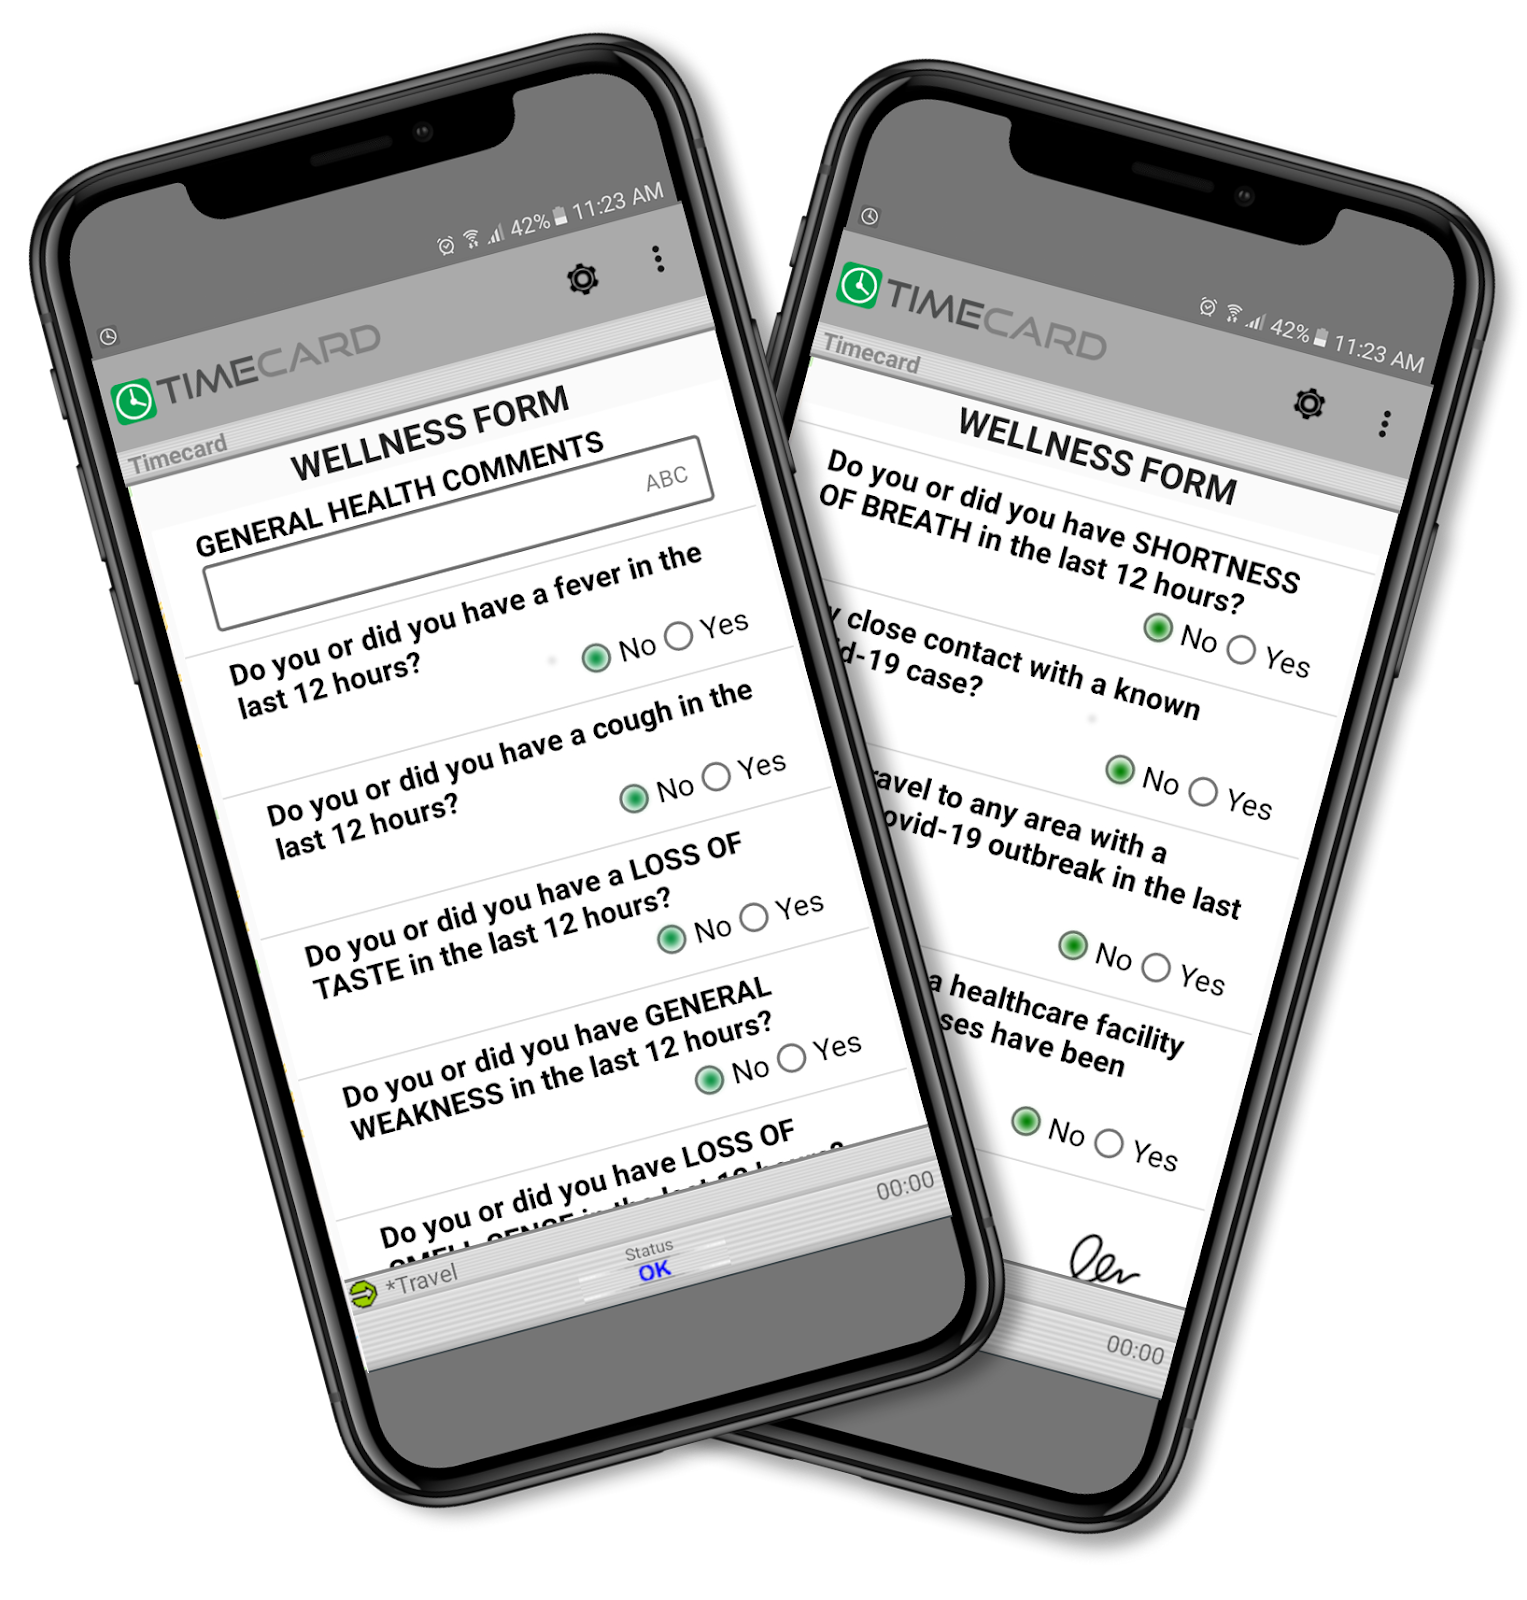
In this example, we have a form that our company uses to gather details about our customers, notice that we have the fields called "Customer Plan" and "VIP Customer?". With the current setup, employees need to select the plan the customer has and then at the end of the form, answer if they are VIP or not:


When we see in detail this "Customer Plan" field, we can see the four tiers, depending on the plan that our example customer has, "Bronze", "Silver", "Gold", "Platinum":


Our "VIP Customer?" field is also pretty simple, just a Yes/No question so that a Manager can check on a report and handle it as they see fit:


Nothing too fancy here, it just works... But what if we wanted to make it more interesting and more productive? Well, here is where editing values for existing custom fields would come in. We want to make this "VIP Customer?" field shown only for Platinum customers, since it is a bit redundant having to fill that every time. Not only that, but to save time for our Manager, we want to send an automated email every time one of our employees has completed a job for a VIP customer so that we can send a thank you note and a care package. We want to make our top customers happy, of course!

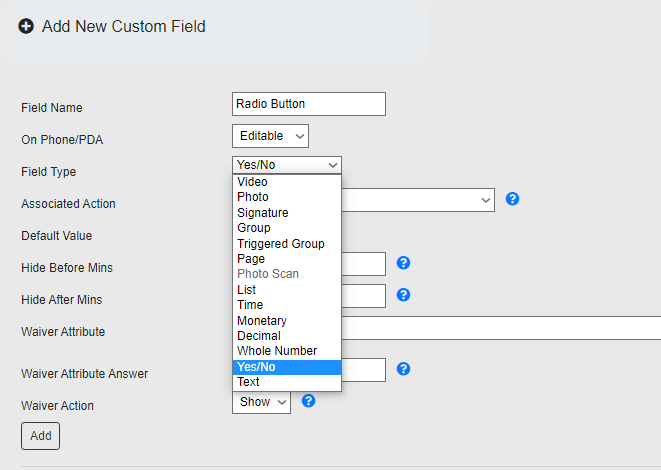
For this, we just need to go to "Rules, Action and Fences" in the Administration tab, then Customer Service, Manage Action and "Add New Action":


Here we can create our notification which will be added to our existing custom field:


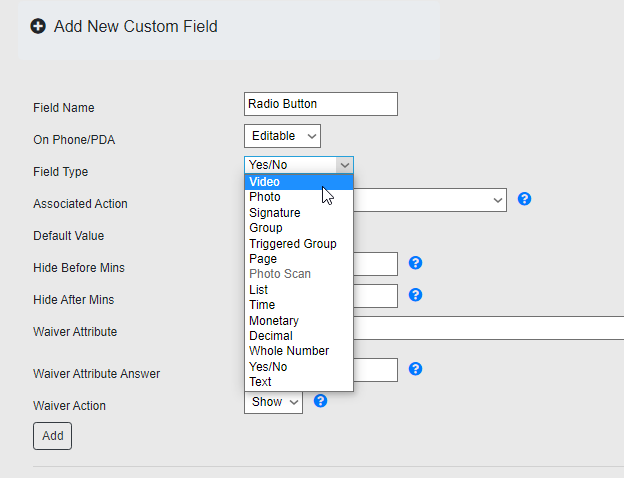
Then, we can go back to the form where the "VIP Customer?" field was on and add the Associated Action we just created, called "VIP Customer Notification". Then, to make this question show up only if we selected a Platinum Customer Plan, we change the Waiver Attribute to "Customer Plan", to point it to that specific field, and then we type "Platinum" in the Waiver Attribute Answer to use it as the answer that will make this field be shown in the application, then click on "Save":


You will notice that our "VIP Customer?" field will now have the "VIP Customer Notification" in the "Associated Action" field, which used to be blank before making our changes, all without the need to delete and add any fields:


This is a very powerful tool that can be taken advantage of with a bit of creativity, for any questions or ideas on how you could use this, leave us a comment below.


--Econz Team

Wednesday, September 16, 2020

Two New Forms Feature Improvements: Video Capture and Radio Button

We are excited to announce that we have been working on some improvements to the forms features given feedback from our existing customers. These enhancements include the ability to now record a 30-second Video inside the form and being able to see Radio Buttons for answers based on Yes/No questions.


Radio Buttons

Given more and more of our customers are using our solution for Covid-19 Self-Assessment Surveys, the radio buttons from the custom fields is a new “customer favorite” as this feature allows field workers to answer Yes/No questions quickly and in a more convenient way.


Here’s an example view from the Wellness Form: 


The first step to enable this feature is to go to the Basic section in the Administration tab and selecting "Preferences". Find the option called "Render Yes/No field as radio buttons" and tick the checkbox as follows:


Scroll to the bottom and click on "Save" to apply the changes. Next, in the same "Basic" section, go to "Manage Custom Fields/Forms". Here make sure to select the Field Type "Yes/No" when creating the new Custom Field and click on Add. The process here is the same as always, to learn more about it, we have an article dedicated to working with Forms:


30 Seconds Video

This feature gives the field user the capability to take a 30-second video inside a form to document customer visits or important things happening on the field.


To create a Video Custom Field, the steps are the exact same as described in the previous point, that is, going to the "Manage Custom Fields/Forms" section and adding a new field in a form. In this case, make sure to select the Field Type called "Video" and click on "Add" once you are ready:


That's it for now! We hope you take advantage of these incredible new features, be on the lookout for new things that will be coming up.


--Econz Team 


Friday, June 5, 2020

COVID-19 Self-Assessment Form/Survey


During these challenging times, Econz Wireless has been assisting our customers with creating their own COVID-19 Self-Assessment Forms/Survey questions and PDF output. The idea behind this is to provide employers the necessary tools to document and keep track of their staff's health, and then take decisions according to the information provided by the field collaborators.

When using the COVID-19 Self-Assessment questions, the forms are set as required to be completed prior to clocking in or starting the shift. Below are a few examples of the type of questions that can be asked to your field employees:


The COVID-19 Self-Assessment features includes: 

  1. Required questions and digital signature to be completed prior to the field employee’s start of their shift.
  2. Real-time alerts when questions require managers/supervisors to be notified.
  3. Custom PDF output with company logo and digital signatures.
  4. Schedule PDF  to be sent to Managers/Supervisors/HR Directors daily, weekly or as needed.


If you wish to learn how this can be setup, make sure to check out our post on creating Custom Forms/Surveys.

Please reach out to our Customer Support Team in case you had any additional questions.

Until next time!


--Econz Team


Wednesday, July 18, 2018

Feature Enhancement: Seeing Forms when Changing Tasks

On a previous post, we had covered the topic of Forms, how to create and maintain them, and also how to use them in the mobile application.

A new enhancement has been put in place, where not only you can control if the Form pops up the moment you clock in, clock out, or make it accessible anytime during the day, but you can also set it to pop up every time you change the task.

To enable this, make sure to move the "Change Task" option to the right on the Triggers filter, when you are inside the main screen on the form that you are editing.


Click the "Save" button at the bottom of the screen and you should be set!

We are always thinking of ways to improve your experience, so please don't hesitate to leave us a comment if you have any suggestions.


--Econz Team

Thursday, July 5, 2018

Timecard GPS New Feature: Enhanced Forms View

We have implemented a new feature that will enable you to enhance the way you currently view Forms and Custom Fields.

At the moment, the default option is the Classic view, which is good if you prefer a more compact screen, here is what it looks like:


To change this, tap on the Gear icon, and select Settings, once in the screen with four yellow icons, tap on the Menu again and select "Extras".

You will see the following screen:


Notice the "Enhanced Forms View", make sure to set it to "ON" and tap "SAVE" at the bottom.

Next time you want to access your Custom Fields or Forms, they will look like this:


They will have an attractive layout that will also give you a hint as to what type of data it can capture.

We hope you like this new feature, designed to give you more control of what the application can look like, let us know if you have any questions or comments!

--Econz Team

Tuesday, June 27, 2017

Timecard GPS: Sick & Annual Leave Forms

The Sick & Annual Leave Forms are part of the newest features we have implemented in our system. These Forms will enable field employees to apply for Sick and Vacation Leaves directly from the application so that an Administrator can either Approve or Reject this request.

To set this up, the first step is to setup the Administrator or Administrators that will have access to an employee's requests. Please keep in mind that not all Administrator users will be able to approve or reject requests, only the ones that have been manually assigned to a specific employee.

For this, go to the Administration Tab and click on Manage Users. Then, find the ID of the Field Worker you would like to setup a Leave Administrator for.

At the bottom of the user's profile, you will find a section called "Leave Administrator". Use the dropdown menu to select the Administrator and click on "Add". If there are going to be multiple admins, you can select all the ones you need and once you are ready, click on "Update".

With that properly setup, let's learn how to use this new feature!

This option can be found by accessing the Menu, it's called "Leave Forms":


In here, you will find the next screen:


Make sure to select the appropriate option according to your needs. Both options work the same way, let's create an Annual Leave Form by tapping the "Annual Leave" button.

The next screen will show you options to enter the Start and End dates and times, so make sure to enter them correctly depending on your personal needs.


Use the "Notes" field to enter a description or any message that you consider necessary. You can use the "Attach Photo" option to include a receipt, a doctor's note, or anything that might be important or mandatory according to your company policies.


When you are, tap on "SUBMIT" on the top right. You will see a Warning screen, select "SUBMIT" again if you are confident that you uploaded everything you needed and setup the dates and times properly.


Now let's move on to what the Administrators will see. Here is an example of a company's requests and their different statuses:


There are two pending requests that need to be either approved or rejected. This can be easily achieved by clicking on the appropriate button next to the request.

Notice on the last item there is an image icon next to the word "Approved". This is where you can click on the see any attachments the employees have sent. When you click on it, you will be prompted to either open the file or save it to your computer, depending on your browser settings.


We hope this feature makes managing employees' leave time more efficient! Leave us a message in the comments section if you have any questions or thoughts.

--Econz Team