Friday, June 24, 2022

Setting up Canada Specific Overtime Rules

Hello everyone! Today we have a very interesting post about a new feature that has been added to our system. This feature has been put in place for our Canadian customers who need to set an overtime rule that takes care of adding up the overtime hours at the end of the month for every instance that an employee worked over 40 hours in a given week. This way, instead of paying overtime weekly or bi-weekly, it is going to be paid at the 4th week of the month.

To set this up, you need to create a user type that will be used solely for employees who this rule applies to. For the sake of this example, we created one called "Fourweek0T40", but make sure to name it as something that makes sense to your own organization:


Then, go to the Manage Overtime Rules in the Administration tab and follow the necessary steps to create the rules.


After selecting the user type you wish to manage, which should be the one that was recently created for this specific purpose, then we click the "Manage" button:


Set the date when the rule will be applied for; keep in mind that the correct overtime rules will not be enforced on any entries before this date. Here is an example of how this can be setup, taken from the Overtime section on the screen you are taken to:

Click on the image to enlarge

Note that we have set it to "Any time over 160 hours, reconciled over a period of 4 weeks." This shows how the system will recognize that the employee has worked any overtime going over 40 hours in a week, within a 4 week period.

Then, we set the start of the first of these periods, like "01 May 2022" in this example, and finally, the last piece of the puzzle is setting "Workers are guaranteed 40 hours per week, with any extra regular hours reconciled at the end of the configured period". This prompts the system to calculate those extra hours that may have been accumulated at the end of the specified 4 week period.

After this, it's just a matter of following the usual process of approving the timesheets and sending the Payroll Data Batch, the additional overtime hours will only be shown on the timesheet for the last week of the monthly period. Each weekly period will show the total worked hours in contrast to the maximum of 40 reported hours.

Also, after sending the weekly hours with the integration, there is an additional new step that needs to be taken to reconcile those overtime hours. Using the "FourWeeklyReconciliation" filter and combining it with the desired user type and payroll period, we will be able to see the users that have outstanding overtime:

Click on the image to enlarge

Note the total Regular ("R") hours on the first row, followed by the 18 Overtime ("O") hours on the next row.

That's it for the moment, next week we will show you additional details related to this post, so stay tuned for more!


--Econz Team


Wednesday, June 15, 2022

The Expanded Timecard Task Event and Location Report

Hello everyone,

Today we want to talk about one of our most recently incorporated reports, the Expanded Timecard Task Event and Location Report. This one is sort of a combination of the Timecard Event Report and the Timecard Task Event and Location Report.

When you generate it, you will notice the inclusion of four new columns:

  • Start Event ID
  • Start Break Event ID
  • End Break Event ID
  • End Event ID

These columns will provide you with the information of the ID associated to each of the events gathered from the device by the employees, which can be used to create an upgraded costing analysis for your field jobs that can be used with the integration software of your preference.

Compared to the Timecard Event Report, which created a new row for each event, this one summarizes all events related to a specific entry, so whenever you start, end a task and/or take a break in between, the event IDs for each will be shown on their corresponding column and row:

Click on image to enlarge

As with most of the reports, you can generate it online or export it into a CSV file using the date range, user and team filters of our choice.

We hope you get the best out of this report, let us know if you have any questions or comments down below!


--Econz Team

Monday, June 6, 2022

Enhanced Auto Timesheet

Hello everyone, today we have an awesome update related to creating auto timesheets; we have added new functionality to make this feature much more robust. You will now be able to create timesheets with multiple tasks during the same day, make them recurrent, and even skip weekends if needed!

To enable this functionality, first we need to go to Administration tab:


Then, you can start adding timesheets, just go to the Field Workers tab, find the employee you wish to generate timesheets for and click the "Update Roster" button:


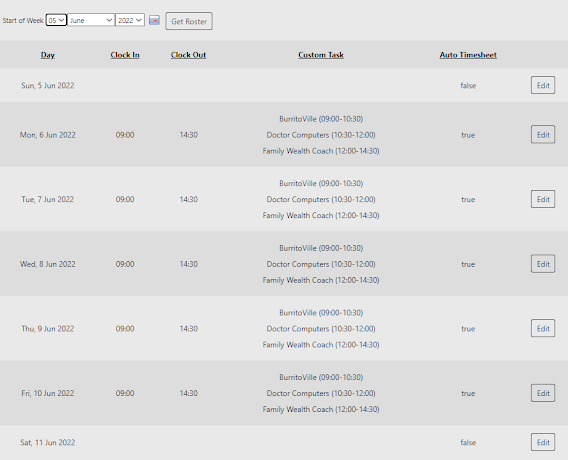
Then, you can select the start of the week, click on "Get Roster", then click the "Edit" button on the day you wish to add your changes:


You will find multiple options on the top section:

  • Auto Timesheet: enable this so that the system generates the timesheet automatically as the hours of the day pass by, simulating the generated entries as if they were added by the employee.
  • Recur Daily: use this if the employee will work on the same set of tasks on a daily basis.
  • Include Weekend: leave this unchecked if the employee won't work during the weekends so there are no punches generated on Saturdays and Sundays.
  • No End Date: click this option so that the tasks are created indefinitely.
  • End By: if the specific set of jobs you are entering are supposed to end at some specific date, then you can use this so the system stops at that day.

The next section is where you will create the actual punches, it's as easy as selecting the start and end times, then the task and subtask, if available, and clicking the "Save" button. If you need to add multiple tasks, use the "Add Change" button to add new rows until you have added everything  you need, then Click "Save" at the bottom.


Alternatively, use the red X button to remove a row. Once the changes have been saved, you can go back and view the whole timesheet preview:

Click on image to enlarge


Make notice of the fact that we chose to exclude weekends on this employee's timesheets, so Sundays and Saturdays are blank. You can also do any necessary edits after creating the auto timesheet, just click the edit button and follow the same process we just described.

That's all for now, make sure to use this wonderful time saving feature to your advantage and let us know if you have any questions or need any help setting it up.

Until next time...


--Econz Team