Tuesday, December 18, 2018

Update to Leave Request Functionality

On a previous post, we had talked about the Leave Request functionality, where field employees can apply for Sick and Vacation Leaves so that an Administrator can Approve or Reject this request.

We have added new functionality to this same module that will assist Managers adding vacation and sick time for employees that don't have the device in hand or don't have any device at all but are in the system and need to request for a leave.

To add a Leave Request from the Web Portal, go to the Administration tab and select "Manage Leave Applications":


Then, click on the "Add New" button:


Enter the appropriate User name, Leave Type, Start and End times and a Comment. Once you are happy with the entry, click on "Save":


This will add the Leave Request in the system and it will be shown on a number of reports, such as the "Sage Timberline Import Report". Note that you will be able to filter the dates even in advance, if the request was done for a future date:


In addition to that, but the Timesheet Signoff screen will also provide the details to the employee of the approved requests and the dates they correspond to.

We hope you like this feature, leave us a comment or question in case you would like to contact us.

--Econz Team

Tuesday, December 4, 2018

Advanced understanding of the Clock In/Out Exception Report Features

On this post we are going to cover the topic of Clock In/Out Exception Rules. These are rules that can be setup to keep track of employees that haven't clocked in or out within a specific time frame. 

Whenever an employee triggers one of these rules depending on the conditions that you have setup, an entry will be created on the "Clock In/Out Exception Report".

To set this up, you need to go to the Administration tab and select "Rules, Action and Fences":


Next, select the option called "Customer Service":


Once inside, click on "Add New Customer Service":


You will notice that this is very similar to creating a Smart Fence, so go ahead and enter a meaningful name for the rule, we recommend to use the same name on the subsequent steps as to make it easier to manage. Choose which users the rule will be applied to and then click on "Create New":


On the next step you will be able to select the rule, be it "Clocked IN or OUT Outside Allocated Time Window". You will also be asked to set a time frame, make sure to select the appropriate week days and times:


Notice the option called "Trigger Immediately". If this option is disabled, the Clock In/Out Exception Report will not show the missed event until 48 hours have passed (just in case the event is queued on the phone - this is to prevent false positive detections). So, if the employee doesn't do anything within this time frame, an entry will be created according to the rules.

As an example, if an employee forgot to clock in on December 1st, then, if the employee hasn't clocked in by December 3rd an entry will be shown of this punch having been missed on the 1st. But, if the employee missed the punch on the 1st but clocked in until the 2nd, then an entry will be shown, specifying that the employee missed the punch on December 1st.

On the other hand, by turning on the "triggered immediately" tick box option, an entry will be shown once the server has detected that the user hasn't clocked in or out at the specified time when the time frame begins.

Here is a sample of what the report would look like on different scenarios, the entries that have "Delayed Check" are created with "Triggered Immediately" disabled, and the the ones with "Immediate Check", have it enabled:


Let us know if you have any questions or contact our Support Team who will be more than glad to assist you with anything you need.

--Econz Team


Tuesday, November 20, 2018

New Report: Timesheet Event Report

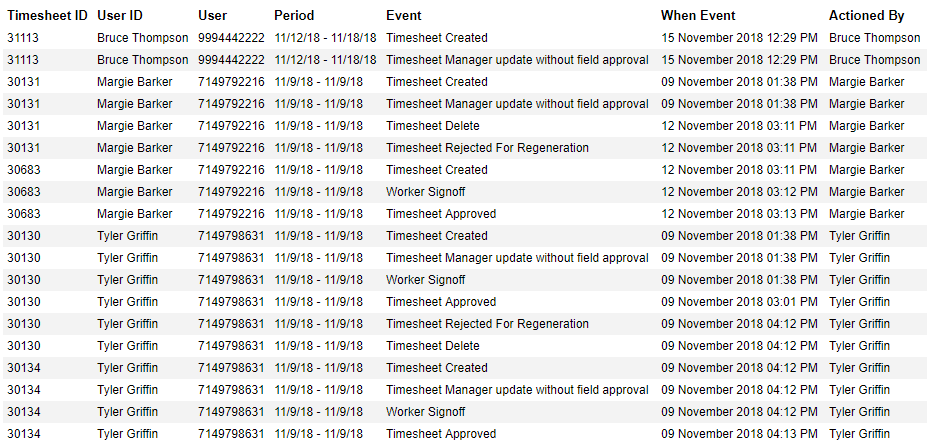
We have created a new Report with all the companies that use the Timesheet Signoff functionality in mind. It's called "Timesheet Event Report".

Whatever event related to timesheets being approved, rejected, edited or updated will be shown in this report, along with the date, time and person that caused the event.

Here is a sample of the data that this report would generate:


The Timesheet ID on the left corresponds to the same Timesheet ID that a Payroll Administrator, Operations Manager or an Office Administrator would see on their Timesheet Approval screens.

To learn more about Timesheet Signoff you can visit the following links:
Until next time!


--Econz Team

Friday, November 9, 2018

New Feature: GPS App Locked

Hello everyone, today we have a brand new feature that we have added to our system with companies that rely on GPS in mind. Timecard GPS will now give you the ability to disable the mobile application whenever the GPS settings have been turned off.

It's pretty easy to setup, just go to the Administration tab and select Preferences. Once inside this section, scroll to the bottom and you will find the option called "Disable GPS Unit on Phone":


Then, if the employees have the GPS disabled...


Whenever they attempt to clock in, change a task, start or end a break, the application will notify them that the GPS services have been turned off:


Once the GPS is enabled, the application will continue with the expected functionality.

We hope you can utilize this functionality to enforce correct GPS usage on your staff and help you get the best possible GPS tracking.

Let us know if you have any questions or comments.

--Econz Team

Friday, October 26, 2018

GPS Auto Change Tasks

Hello everyone!

On this post we have a really useful feature for those companies that want to make use of the application's GPS capabilities to make life easier for their employees. We will show you how to set up tasks so they can be changed automatically using the employees' location.

The first step is to make sure that you have tasks with addresses. If the project doesn't have a specific address, make sure that you use the coordinates instead:


Also, notice with the SmartFence section is set to Default, this is very important since we will setup the Default SmartFence to trigger the automatic changing of tasks. This is done as follows:

In the Administration tab, select "Rules, Action and Fences" and select the "Manage SmartFences"option. For this, you will only work with the Default rule. We are going to create two rules and apply both to the Default one.


The first rule is going to be used to start each task when an employee is entering an area. On the first screen, set the radius to your desired size and click on the "Create New" button, then you are taken to the Rules section. Here, select "Entering Area" and name the rule using the terminology that suits your company the best:


Then, click on "Create New Action". This next step is where you will set the Automatic Field Device Event, so select "Change Task". In this case, since we want to be able to change to any task using the location, make sure to leave "Set Task Info" unchecked.


Then you can save it and go back to the previous screen, where you can click again on "Save" to go where you entered the radius.

Next, click on "Create New", we are going to add the rule to switch to Travel when the employees leave the area. You will notice that the process is almost the same. Create a "Leaving Area" rule and name it Travel or whatever works for you:


Then, click on "Create New Action", this time we will use the same Change Task event but we will check "Set Task Info". This will enable us to select the specific Task that will be selected when the employee leaves the area:


You will get a drop down menu with all the tasks for all the teams, so make sure you select the appropriate one. Save it and go back until you are at the first screen (where you set the radius) and click on "Save". With this, the rules are ready to be used.

At the beginning of the day, employees will need co clock in to activate the GPS tracking. Here is an example of what it looks like on their History:


And this is how the tasks are shown in the Timecard Task Detail Report:


We hope you can make the best out of this feature, let us know if you have any questions or comments.

--Econz Team

Tuesday, October 23, 2018

Approve Unsubmitted Timesheets

Our Timesheet Signoff feature has been updated with new functionality that will allow you to approve timesheets even if the employee hasn't signed them.

This feature will only be available for Payroll Admins, and it's recommended to be used on cases where the employee is out on vacation and can't sign his/her timesheets or that the phone has been lost or damaged.

In order to do this, make sure you are logged into the web portal as a Payroll Administrator and go to the Approve Timesheet section on the Administrator tab. You will be able to easily find any Unsubmitted timesheets since they are colored in blue. Of course, you can always use the Status filter to focus only on them:


Find the timesheet you are looking for and click on "Not Available" on the ID column. You should see the following screen:


Notice how the Approve radial buttons are disabled, but you can see the total times for the hours the employees have clocked. Click on the "Submit for Employee" button to proceed.

Once you do that, then you will see the familiar Timesheet Approval view, where you can approve and edit timesheets as you would normally do:


Once you are ready, approve the timesheets by clicking on the "Save" button. After this, the timesheet will have been properly approved:


Finally, something very important to mention is that the Timesheet Event Report will generate an entry indicating that the timesheet was approved without the user's input, in order for Management to keep that as a backup and for future reference:


We are always trying to make your life easier and we can do this with your valuable feedback, so make sure to leave us any questions in the comments section.

--Econz Team

Friday, October 5, 2018

Enhancements to Edit User Events Screen

We have added a simple but very useful enhancement to the Edit User Events section, as always trying to make your life easier.

You may recall that on this specific section you used to be able to edit one day at a time, but now you can use the date filters to edit a whole period, if you need to.


Make sure to use either the Team or User filters when you use this functionality, you will get a message reminding you about this in case you don't:


So, once you have your teams or users selected, along with the time frame you would like to see, click on the Filter button and now you can get to work!


We hope you like this improvement, make sure to leave us any thoughts in the comments section below!

--Econz Team