Wednesday, March 28, 2018

New Feature: GPS Based Tasks

Have you every wanted the application to show only tasks that are within a radius from where your employees are? Well, we have listened to your wishes and here we present you this wonderful new feature, GPS Based Tasks.

The first requirement is to upload your tasks with addresses, since these are going to be used to compare to the employees' current location.

Once you got that, then the rest is done within the application.

First, let's take a look at the list of tasks with this setting disabled, the employee would clock in as normal and see this:


That is the full list of tasks. But what happens if you have thousands of tasks but want to limit the list to just the ones they are close to? Here is where it starts getting interesting... Open the Menu in the main screen and select Settings:


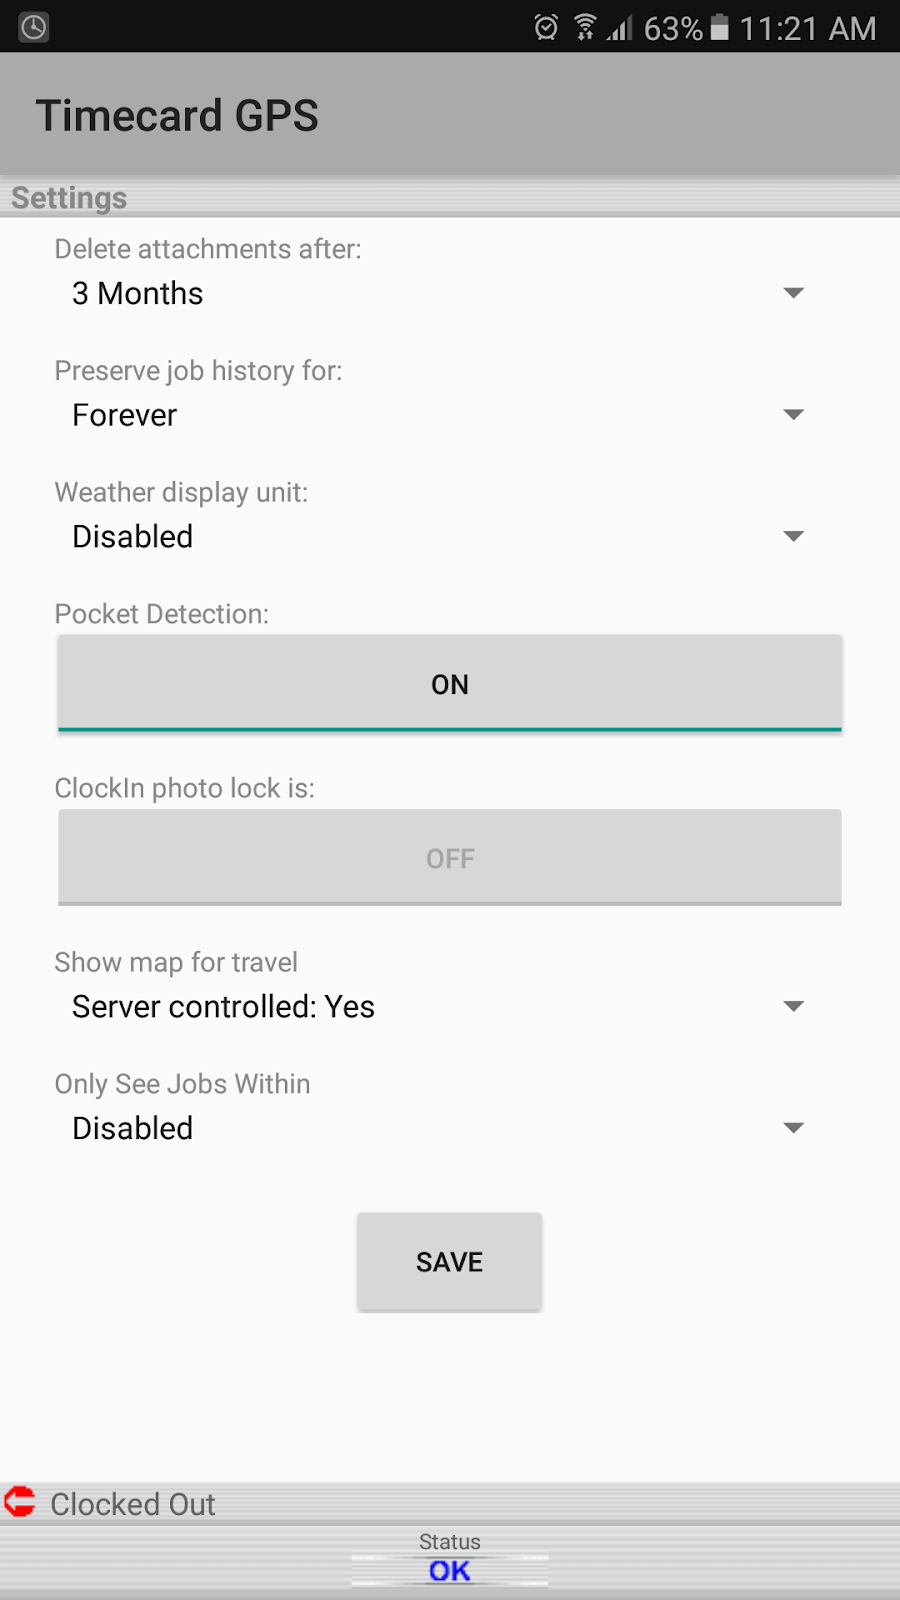
Once in the Settings, open the Menu again and select "Extras":


Notice at the bottom of the screen the option called "Only See Jobs Within". If you tap on its dropdown menu, you will be able to select either Miles or Kilometers to enable the GPS Based Tasks.


For this example, we are going to select "Miles". This will enable a space where you can type the radius (we want it to be 0.25 miles for now). You can also choose to hide any jobs that have no coordinates (this means jobs that were uploaded without any addresses), and finally, you can also set the amount of minutes that have to pass so the location is refreshed, which will update the tasks list.


When you go back, you can open the Menu and select Connect or open the tasks list and tap the Refresh icon on the top right (the icon with two circular arrows). Notice how the app will attempt to update your current location:


Now, when you try to clock in again (of course this will also work while you are clocked in), the tasks list will only show jobs that are within 0.25 miles:


You can adjust the radius according to your needs and this will affect how many tasks you can see:


Leave any questions you might have in the comments section, we hope you get the best out of this new feature!

--Econz Team

Wednesday, March 21, 2018

New Feature: State Based Overtime Rules

We are very excited to show you this new feature where you can set overtime rules that will be automatically applied to the state the employee is in.

Keep in mind that for this to work properly you must have uploaded tasks with addresses, since these are the ones that will be considered to determine which state the employee clocked in at. If tasks have no addresses, then the default overtime rule will be applied (assuming one has been created).

The first step in setting this up is to go to the Preferences screen in the Administration tab. You will notice this section at the bottom:


Click on "Enable State Based Overtime Rules" and then select "Save".

Next, go back to the Administration tab and on the the bottom right you will find the Payroll section, so go ahead and click on "Manage Overtime Rules":


Then, select the User Type it will apply to, on most cases this will be the "Field Worker":


On the next screen you will be able to setup the overtime rules, use the State dropdown menu to pick the state (note: currently this feature is only available for USA based customers):


Here is an example of how to setup the rules for California, make sure to apply these according to your company's needs:


Notice the section called "Only Include Regular Hours in Overtime/Extratime calculations". This is needed in case the overtime has to be calculated only using the regular time portion of each day.

Also, you can setup either daily hours, weekly hours and even set a point in the week that will be considered overtime if the employee has worked a specific number of consecutive days.

Once you are happy with the rules you created, you can click on "Submit".

When you go back to the Manage Overtime Rules section and click on "Field Worker, you will see all the rules that you have created.


That's all for now! Remember to leave us any questions in the comments section.

--Econz Team

Friday, March 9, 2018

New Feature: Changing Home Screen Labels on the Application

We have recently implemented a nice new feature that will allow you to make Timecard GPS even more your own.

When employees normally launch the application, they would see the default labels "Clock In", "Start Break", "Change Task" and "View History", but now you are able to use your own labels and customize it to make it more meaningful for your staff.

This is what the default application will show at the start of the day:


This is what you will see when you are clocked in:


And this is what is shown while you're on break:


Let's go ahead and make some changes! First, go to the Administration tab and find the option called "Update Phone Labels" in the Advanced section:


Next, type in your own labels, here are some examples, just to give you an idea:


Note that these fields are optional, so you can leave some of them blank if you wish to keep the default labels.

Click on "Save" when you're done. Next, go to the app and hit Menu (the gear icon) and then Connect. When you tap on any of the icons, you will notice these will change, so here you have them in the same order as shown above. First, the main screen when you are clocked out:


Then, when you are clocked in:


And finally, when you are on break:


We hope you like this feature and it helps you make our application more user friendly and customized according to your needs.


--Econz Team

Thursday, March 8, 2018

New Feature: Searching and Adding Team Members

There might come the time when your supervisor is out on the field with his/her team and you need to have additional staff sent to that location. It could be someone that doesn't belong to that team but still needs to be clocked in.

This can be easily accomplished without the need to assign that person through the Administrator portal, the supervisor will only need to follow this quick guide!

First open the Menu and select "Team Clock In/Out". Once in here you will be at the screen where you can clock team members in.


Open the Menu again and you will find an option called "Add":


Once you tap "Add", you will be asked to enter the employees Device ID. Make sure to contact your Manager to get this information, or you can also ask us in Customer Support.

Enter the device ID, tap on Add and you will get a confirmation screen. If you are confident that it's the addition you want to make, tap on Add again:


The employee will be added to the list of Team Members, so now you can tap the user's name and clock him/her in as you would normally do:


Keep in mind that the user won't be added to your team permanently unless this is done by an Administrator.

Let us know if you have any questions, we hope you like this new addition!

--Econz Team