Friday, November 25, 2016

New Feature: Photo Clock-in

Have you ever needed confirmation that the person that is clocking in with the app is really the real employee and not someone else?

Here is the solution for you, a new feature called "Photo Clock-in".

This has to be enabled from the app, just go to the Menu and select Settings, from there, open the Menu again and select the option called "ClockIn".

The next step is to enable the Photo Clock in feature and tap on "Save".


So the next time the employees attempt to clock in, the Camera will be launched, prompting them to take a picture to be able to access the tasks. If you are happy with the picture, tap on OK.


Then, tap on Submit to continue. After this you will see the list of tasks.


Select the one that applies to you and also the subtask if available, and you will be successfully clocked in!


That's all for now! We hope you like this new feature as much as we do!


--The Econz Team

Monday, November 21, 2016

New Feature: Weekly Timesheet Signoff

Hi everyone!

Here is the Econz Team bringing you more interesting news about a new feature we know you will love.

This time we have the "Weekly Timesheet Signoff", which you can use to have team members signoff their own weekly timesheets directly from their supervisor's device.

This needs to be enabled by an Administrator from the web portal. Go to the "Administration" tab, and select "Preferences". Look for the following option and make sure to click the checkbox.


Hit on "Save" and the rest happens with the mobile application.

The idea is that the person in charge of doing the punches will be able to access something called "Multi User Mode". Typically the weekly timesheet signoff is done a week after the punches were entered, so open the Menu and select this option:


Next, the team member will be able to enter his/her login credentials and password and tap on Login. The app will attempt to connect with the server.


Next, the employee will see a summary of the worked hours corresponding to the previous week, if everything is correct, this person can use the below field to place their signature. If they need to correct it, just tap on "Clear", and if they are good to go, select "Save".


You will get a confirmation asking if you wish to send the signature. Select "YES" and then the app will submit the signature.


Finally, open the Menu and select "Logout" to finish the session and allow someone else to do the timesheet signoff. You will get a confirmation screen, if you are ready, then select "YES".


That is pretty much it! Simple and effective... Let us know if you need any assistance and we'll be more than glad to go over the steps with you.

Until next time!


--The Econz Team


Thursday, October 13, 2016

New Feature: Schedule Multiple Reports

If  you ever felt the need to have all your reports sent to your email without even accessing our Web Portal, you will be very interested about what we are showing you in this post.

This is a brand new feature you will find on the Reports Tab called Scheduled Reports. To access, of course, go to the Reports Tab and click on "View Scheduled Reports".


Once inside, you will see the screen where all of your Scheduled Reports (or groups of reports) will be listed. If it's the first time, it will be empty, but let's change that! Click on the Add button.


The following image illustrates the different fields that you will see on the next screen:


  1. Enter a Description for the Report you are creating.
  2. Use this field to Add/Remove all the reports that you want to include in the same email.
  3. Pick your Time Zone.
  4. Select the period you want the report to be generated at.
  5. Select whether the report is generated indefinitely or if it should end on a specific date.
  6. Here you will select if you want to create a CSV file (Excel Spreadsheet) for each individual report or want the HTML version (similar to generating it online). Then:
    • Email To: Type the email addresses you wish to send the emails to, use commas if you need to list more than one
    • Email Subject: De fine the subject of the Email on this area.
    • Email Body: This will be the body of the Email that will be generated.
When you are done, click on Save! Once the report is generated, you can see it listed on the "Report Schedules" screen. To edit it any of its values, click on its "ID" and that should be it.

Hope you like one of our favorite new features, let us know your comments or questions in the comment section or contact us at (866) 403-3475, or email customersupport@econz.com


--The Econz Team

New Feature: Google Traffic in the Timecard Map

Have you ever wondered if there was a simpler way to send your employees quickly to a location taking traffic into consideration?

Wonder no more, we have a solution for you, it's as easy as a couple of clicks.

First log into the Web Portal, the first thing you will see is the "Home Lists" screen (where the map is). If the map is not showing, click on the "Show Map" tab to the left and you will see something like this:


Next, click on "Filters" on the top right of the map and it will open a dropdown menu with different options to give you control of what you can see displayed.


Finally, tick the "Traffic" checkbox and you will see all the streets show colored lines according to the traffic statistics provided by Google:


That's all it takes! We hope this feature will aid you in making your company more efficient and productive.

Let us know if you have any comments or questions. Until next time!


--The Econz Team

Wednesday, October 12, 2016

New Feature: Managing Clock In and Out Alerts

Hi everyone!

We are very proud to inform you of our newly added feature that will enable you to be notified if an employee hasn't clocked in or out within a specific time frame, so let's get started!

As usual, the setup is done through the Administration tab on the Timecard Web Portal. Click on "Rules, Action and Fences" and then, once inside, select "Customer Service".


Click on "Add New Customer Service".


Follow the next steps from this image:

  • Name: Enter the name of the alert
  • Users: Here you can either apply the alert for All Users, or pick the specific teams or users that it should apply to.
  • Rules: The next step after this is clicking on “Create New”. Don’t save it because the alert is not ready yet!
On the next step, you will create the alert, make sure to name it the same as in the previous step for consistency and easier management, for that, use the Name field.


Trigger: Select the appropriate trigger from the Trigger dropdown menu. For the purpose of these alerts, use either "Worker Clocked In Outside Allocated Time Window" or "Worker Clocked Out Outside Allocated Time Window".

After selecting the trigger, you have to set the timeframe for which the alerts will apply, as shown on the next image. Make sure to select the appropriate time and dates, since these will be the ones used to monitor if the employee has clocked in or out between these times. The "Trigger Immediately" option will enable the system to alert you if the timeframe has started and the user has not clocked in or out (according to your rules). If this is left unchecked, then you will be notify until the user clocks in or out, and not right when the timeframe starts. When you are ready, click on “Create New Action”.


These next steps will show you how to setup an alert so you can get an automated email whenever an employee triggers one of the events we setup on the previous steps. This is what you should see:


  • Action Name: Enter the name of the alert.
  • Send Email Alert: You can setup an Email Alert to be sent to any person that you need, just make sure to enter the email address on the Email To field. If you are using multiple addresses, separate them with commas. Enter the Email Subject and Body. When you are ready, click on "Save".

You will be taken to the previous step, now the ACTIONS dropdown menu will be pre-populated with the Action (Email alert) you just created. Click on “Save” to continue.


Next, you will be back at the initial screen where you originally named the alert and specified the teams/employees it applies to. The dropdown menu will also be pre-populated. If for any reason the dropdown menu is blank on this or the previous step, do not worry, if you had created the rule or action, you can just open it and you will find it there. Click on “Add Existing” to add the rule. This step is very important because it ties the rule and the alert together, if you omit this and Save it, then the trigger won’t work properly.


Finally, after clicking on “Add Existing”, your newly created alert will be showing just like in the example. Now you are ready to click on “Save”!

Let us know if you need any help setting  these up or want to learn more about our application!


--The Econz Team

New Feature: Setting up Web Team Leaders

Our system now has the capability to add Web Team Leaders, which are managers with web access that can be constrained to view/manage a subset of your companies employees. This is particularly good for companies that have many teams with their own managers, in this case its often useful to be able to restrict these managers to only accessing their own teams.

These are features that Web Team Leaders will be able to perform:
  • Monitor the map for GPS movement
  • Manage jobs and team members for assigned teams
  • View reports for the assigned employees.
This is how you would add and setup a Web Team Leader:

Go to the Administration tab and select Manage Users. Once inside, click on Add New to create a new user.

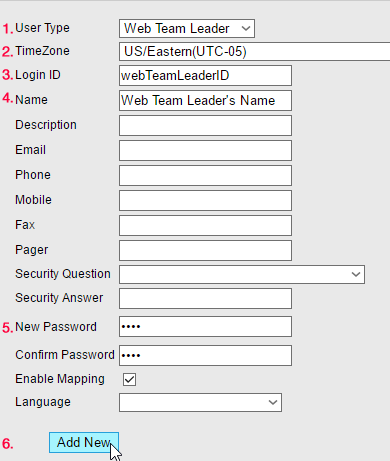
Next, follow the instructions from this illustration stated below:


  1. On User Type, select Web Team Leader.
  2. Select the correct Time Zone.
  3. Enter the Login ID, it will be case sensitive.
  4. Enter the Name of the web team leader.
  5. Type a Password and re-enter it on the next ­field.
  6. Finally click on Add New.
Once the user has been added, it’s time to assign the specifi­c teams that it will be able to see. Go back to the Manage Users screen, ­find the ID of the newly added profi­le and click on it to edit it.


Click on Update Web Team Members at the bottom of the user pro­file.

Assign the Teams/Users for the Web Team Leader and click on Save.

Next time that this user logs in the web portal, he/she will only be able to ­filter and select the assigned users, as shown on the example below:

That's about it! Feel free to email our Support Team at customersupport@econz.com or call (866) 403-3475 if you have any questions.


--The Econz Team


Monday, September 19, 2016

Econz Wireless Web Portal Update Sept. 19, 2016

Econz Wireless is very pleased to announce the following updates to our Web Portal!

  1. GPS Location Report is now showing the specific task the employees selected, so this will be very valuable for Administrators to match the employees' punches with the expected location.


  2. Employee Active Alert functionality added! Now Administrators can setup an automatic alert for the employees to confirm if they are actively using the application. In case the alert is ignored, the system can send a message to the employee as well as an email notification for the managers that the employee may not be active.


  3. Our Clock In/Out Exception Report will now provide details of not only the expected time where the employees had to Clock In or Out, but also the actual time when the punches were entered, so Management can have full control of employees' activity.


That's all for now, but be on the lookout for more exciting news and updates!!


--The Econz Team