Wednesday, July 31, 2019

Search Expired Tasks in Edit User Events Screen

Hello everyone!

On this blog post we are going to talk about a simple but very important enhancement: the ability to search for expired projects when editing tasks.

The default option used to be that if a job was setup with an expiration date, then it wouldn't be available on the device and on the editing screen. For example, we have this job called "Econz Santa Ana" which was good from January 1st 2018, to January 1st, 2019:


When we go to the "Edit User Events" section on the Administration tab, click on the "Edit Task" button and do our search for this task, no results will be found:


But if we go to Preferences and enable "Search Closed Tasks", when we go back, we will be able to find that expired job and edit accordingly.

Here we enable this setting:


Then we search for our desired task and get the expected result:


And finally, we have our successfully saved task:


That's all for now, leave us a comment in the section below in case you want to ask us something!


--Econz Team

Wednesday, July 24, 2019

New Enhancement: Bi-weekly Timesheet Signoff

We have a quick announcement to make on this post, we have just implemented a new much requested frequency for the timesheet signoff: Bi-Monthly periods.

Adding to the ability to sign timesheets daily, weekly or monthly, we are now able to do it bi-monthly, which means that the app will group the punches together in periods from the 1st and 15th of each month, or the 16th and the end of the month the punches are for. The user can sign it off once the next period starts.

To set this up, we go to the Administration tab and select "Configure Timesheet Settings":


Then, we select the "Bi-Monthly" period:

(Click on the image to enlarge)

When the employee signs his/her timesheets on the device, then all the punches for the specific period will be shown:


The manager that would approve the signed timesheets will also be able to view the periods with the appropriate dates:

(Click on the image to enlarge)

As you can see, it's pretty much the same functionality but with a wider time frame that is intended to be used for companies with bi-monthly payroll periods. Here is what the full timesheet looks like right before the manager approves it:

(Click on the image to enlarge)

Leave us any comments or questions down below, we'll gladly answer them or hear any feedback you might have!


--Econz Team

Wednesday, July 17, 2019

Timecard Checker Important Enhancements

On today's post, we will talk about a number of crucial features we have just incorporated into our Timecard Checker functionality:
  1. The ability to change tasks for checker users.
  2. The addition of custom fields.
  3. The possibility to incorporate the end of day questions related to Premium Pay.
To enable these options, you need to access the Checker Main Profile, in this case called "Checker Profile":


Then open the Menu and select Settings. Once inside, open the Menu again and pick "Checker config":


Out of these options, the first two enable the app to pick a task at the beginning of the day and also change tasks, the third one is to enable custom fields (note that forms are not available for checker users at the moment), and the last button is to enable the Premium Pay questions at the end of the day. The dropdown menu at the bottom will allow you to change the size of the name fields in the employees list, in case the default option is too narrow:


Going back to the list on top of this article, the first enhancement is to allow employees to select from a list of jobs when clocking in and adding the option of changing tasks.

The first time a user clocks in, he/she will be shown a list of all the available jobs. As soon as one of these is selected, the user will be clocked in, and from then on, the new "CHANGE TASK" button will appear.

As you might have guessed, this button is the equivalent of the "Change Task" button (icon #3) on the regular version of Timecard GPS, so tapping it will also show you the list of tasks for you to select.


When it comes to the forms, it's just a matter of opening the menu while inside the user's profile and selecting "Add Task Info". Whatever custom fields were assigned to that person will be shown on the next screen:


Finally, at the end of the day, when the user clocks out, he/she will be shown the questions related to the Premium Pay Configuration as follows:


We are always looking for ways to make our applications even better, so make sure to leave a comment down below if you have any cool ideas you want us to look into.

--Econz Team

Wednesday, July 10, 2019

Timecard GPS Supervisor Enhancements

On a previous post, we had talked about our Timecard Supervisor application, designed for field employees to be able to view staff members' punches and basic GPS data.

We have improved the functionality and added a couple of enhancements we think will interest you, so let's get down to it!

First of all, Timecard Supervisor can now approve timesheets for their team members! The first requirement, other than setting up the user as a "Field Worker Administrator" is to check the new setting "Enable Timesheet Approval":


After that, it's just a matter of doing the basic team clock in and out, available from the Main Menu. On this example, we have a few of our team members clocked in and then clocked out at the end of the day:

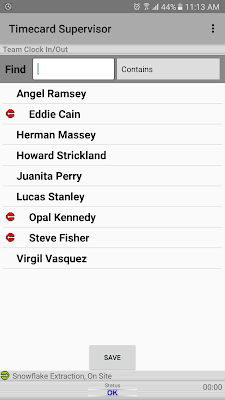
Once employees finish their shift (in the case of a daily timesheet signoff), or when they are supposed to do it depending on the frequency it was setup to, they can use the supervisor's device to access the "Timesheet Signoff" section and approve their timesheets:


As soon as they do that, we as a supervisor will get a notification that a timesheet is ready for approval for that employee:


Now, we can access the menu and there will be an option called "Supervisor Signoff", where supervisors can see a list of all of the pending timesheets. If the employees haven't signed them yet, they will be shown as "unavailable":


If we want to approve user Eddie Cain's timesheets, we just tap on his user ID "101ECain", which at the moment is the only one with "pending" status. We will get a new screen with his total hours, task details and the option to either reject or approve this timesheet:


Once approved, we will get a confirmation message, so to complete the process, we select "APPROVE":


That takes care of the timesheet approval using the Timecard Supervisor app!

The other enhancement we want to talk about is the addition of a full breadcrumb trail, in the past we could only see the last location captured by an employee, but now we can see the whole trajectory for a specific day.

All we need to do is filter it by date and user, then tap on the "TRAIL" button:


Then we will see a beautiful breadcrumb trail showing us all the details for the movement for that specific employee:


We are very excited to share this with you, leave us a comment or question down below!

--Econz Team

Tuesday, June 18, 2019

View User Photos: Filter by Forms

We have just released an update to the View User Photos section in which you can use the "Form" filter to focus on pictures captured in a specific form.

By default, the unfiltered report will show you all of the images and signatures for a given time period:

(Click on image to enlarge)

Let's use the "Form" filter to select the "Location Documentation" form, because we know that today one of our staff members took some pictures for that one:


Once we click on filter, then only the images for "Location Documentation" will be shown, so we won't have to guess anymore!

(Click on image to enlarge)

It's as easy as that! Let us know in case you have any questions or comments.


--Econz Team

Tuesday, June 4, 2019

New Feature: User Specific Rounding Rules

The new User Specific Rounding Rules feature has just been put in place so companies can apply individual schedules for each employee. The idea behind this is that there may come the need to create time blocks where employees are meant to be payed, and by doing this, the system will only count towards paid hours the time inside the block. Everything outside of it will be ignored, and the punches will match to the actual schedules.

The first step is to enable the functionality, this is done in the Administration tab. Click on "Set quantisation data" and select the "User Defined" option and save it:


To set this up, you need to go to the Field Workers tab and click on the ID of the employee you need to apply a rule for. You will find the following new fields:
  • Payable Start: the time the employee is expected to start the shift and what it will be rounded to it if he/she clocks in before that time.
  • Payable End: the time the employee is expected to end the shift and what it will be rounded to it if he/she clocks out after that time.
  • Shift: here you can pick Day or Night, depending on if the employees work a day or night shift.

Notice that if desired, you can setup just a Start or End rule, it's not mandatory to create both if you don't need to. Also, if the employee clocks in later than the Payable Start time or clocks out earlier than the Payable End time, that will count as starting late or ending early, respectively, and no rounding rules will be applied.

When employees proceed to sign the timesheets, they will see the rounding rules being applied. Here is the Timecard Event Report showing the original times for the punches (clock in at 7:45 AM and clock out at 5:08 PM):


And here is what this employee would see in the Timesheet Signoff screen:


When a manager logs in the web portal to approve the timesheets, the rounding rules will also be applied:


The following reports are the ones that will provide the rounded hours:
  • Timecard Task Event and Location Report
  • Custom Report
  • NAR TimeCard Task Focused Custom Report
  • Timecard Detail Report
And we have added a new report called "User Rounding Report", which will give you details of both the actual and the expected start and end times for each employee:

As always, we are working hard to provide you with even more tools to manage your organization. Leave us a comment below in case you have any questions or feedback.


--Econz Team

Friday, May 3, 2019

Removing Users from Timecard Checker

In a previous post, we had covered how to setup and use the Timecard Checker functionality, now it's time to go over how to remove users from the list.

Of course, this is very useful in case an employee was transferred and needs to clock in on a different device, or if the user is no longer in the company.

Here is how to do it, first of all tap the Checker Profile. In this example we have named this user 'Checker Profile' for easier identification, but keep in mind it will most likely have a different name. The idea is that this profile enables the Checker functionality and will always be on top of the list:


Once you do that, open the Menu and select the option called "Manage checker-users":


Next you will see the list of available users, so tap on the name of the one you need to remove. Notice how it's clearly highlighted. Once you have made your selection, tap the "SAVE" button.


You will get a confirmation screen, so tap on "DELETE" to complete the removal:


From here you can just go back, and you will see that the list of available employees has been updated:


That's it for this time! Leave us any questions or comments you might have below.


-Econz Team