Friday, October 1, 2021

Employee Timecard By Week Report

Hello everyone, today we have a brand new report that has just been launched, the "Employee Timecard By Week Report". With this one, you will be able to generate a beautifully presented PDF with a table organizing the tasks depending on the day of the week that they were performed at.

To access it, go to the Reports tab and look for the "Customer Reports" section:


Then, set your filters to the desired week you wish to view, then the teams or users you want to focus on and click on "Generate PDF Report":


Before looking at the final result, let's check the Timecard Task Detail Report to see how the hours for one of our employees would look like. They are already perfectly formatted one row per task:

Click on image to enlarge

But here is the PDF output, notice how neatly organized the tasks and the hours are so you can view it in a semi-calendar fashion, making it easier to visualize the time periods when the tasks were performed:

Click on image to enlarge

The report can be generated for multiple weeks at a time and the report will tell you which week it is, according to the calendar.

We hope you can take advantage of this excellent report, let us know if you have any questions or comments down below.


--Econz Team


Friday, September 24, 2021

Editing Custom Fields with Reasons for Changes

Hello everyone! Today's post will be about working with forms and custom fields that employees have already submitted. Just like with entering Tasks and SubTasks, we are all prone to commit mistakes from time to time, so we have come up with a solution to help you fix that and get not only your timesheets but also your forms to be perfect.

The first step is to create reasons for the changes. These will be added to the same place where you add reasons for editing tasks, and that's the "Manage Edit Event Reasons" setting in the Staff section, within the Administration tab:


Here are the current reasons we have, as you can see, they are intended to be used for editing tasks, so let's go ahead and add a couple new ones to be used with custom fields! First we clock the "Add New" button:


Then we enter the description for this reason and click on "Add New" again:


Here are the two new reasons we have added, make sure to use the ones that make sense to your business:


One of our employees has fill out a form we created called Accommodation Expenses:


When we generated the "Custom Field Report" we noticed that there were some mistakes done. For example, for this particular trip there was no food allowance, as everything was charged through the hotel bill. Also, this form was filled before there was the need for him to stay one additional night, so we also have to change that:

Click on the image to enlarge

For that we click the "Edit" button on the right side of the screen, any would do as it will open the form that we are working on:


First we want to uncheck the "Food Allowance" field. We created a reason for the Yes/No fields, so that's the one we are using in the Reason dropdown menu:


After clicking on "Save" we can generate the report again and the field value will have changed to "No":


Then, we want to reflect what we mentioned earlier so that the meal charges are included in the hotel expenses and raise it to one more night, so we adjust the "Total Amount for Meals" value to zero, edit the total nights to 2 and then change the "Total Amount for Hotel" to $200. For these ones, we want to use the "Editing Custom Field Value" reason and then click on "Save":


When we generate the report, we can confirm that all the values have been changed successfully:


Finally, we can use the "Timecard Audit Report" to review the changes that we just made! Notice how the reasons are used and make sense to the changes we performed, and how we can see both the original and edited values:

Click on image to enlarge

With that being said, we conclude this post! Let us know in case you have any questions or comments down below.


--Econz Team

Friday, September 10, 2021

Enhancements to Overtime Rules: Auto Deduct Breaks

Hello everyone, on today's post we will talk about an updated feature our developers have created for the existing Overtime Rules. Our system is now capable of deducting Breaks automatically and you can utilize different user types if you want these deductions to be applied to employees depending on their role in the company. This is very useful for companies that need to enforce Meal & Rest Rules and want to avoid employees forgetting to punch them with the application.

To set this up, we need to make sure that there are User Types already created, then go to the Administration tab and select "Manage Overtime Rules" from within the Payroll section:


Once inside, use the dropdown menu to select the desired User Type you wish to create the rule for, in this example, we will be working with the "Marketing" profile:


Then, we click on the "Add New" button to create the new rule:


First we tick the checkbox for "Deduct Auto Breaks?", then we add the value in minutes of the total time that should be deducted; we want this to be 60 minutes for this example, make sure to adjust it according to the needs of your company. We want this hour long break to be deducted only if the employee has worked at least 5 hours without taking one, so we set the next value to 300 minutes, then go to the bottom and click "Save":


Of course, we are only focusing on this setting for the sake of this post, but you will find that this is the same screen where you would setup Overtime Rules for the specific User Type. Make sure you have configured that accordingly and set a start day to apply the rule that makes sense, as anything before that date will be ignored.

Now let's go ahead and view an example for a Marketing user, we have "Darrin Schneider" here who will be helping us illustrate how the rules are applied.


Let's check the Timecard Detail Report and see that he worked from 8:00 AM to 5:00 PM and clocked a total of 9 hours, this is before creating the rule:


Next, after applying the rule above of deducting 60 minutes if the employee has worked at least 300 minutes, we can see the difference in the total hours. Notice how the Clock In and Clock Out times are the same for the original report but we have a total of 8 hours instead:


That's it for now! As you can see, it's very straightforward and the changes are applied immediately. Let us know in case you have any questions or comments below.


--Econz Team

Friday, September 3, 2021

Changing User Types

Hello everyone! In this post we are going to cover the topic of changing user types, a feature that will come in handy whenever you have staff changes in a company that requires multiple user types to handle separate payroll and overtime rules. Just by having different user types created you will be able to take advantage of creating separate rules and attaching individual rules to them, but also setting up holiday hours based on said user types.

First, we need to make sure that we already have some user types created. We can confirm this by going to the Administration tab and accessing the "Manage User Types" section:


To make the actual change, we would go back to the Administration tab and select "Manage Users":


Here is a sample of the list of employees we have in our organization, noting the different types depending on the position they are in:


It turns out that we recently promoted one of our dear office staff members Maryann Fitzgerald to an IT related position. First we need to find her name on the list and click on the ID to the left:


Then we look for the "User Type" dropdown menu, which is currently set to "Office Staff":


When we open that menu, we will see all of the options that have been configured in the Manage User Types" section, along with the default user types. Note that the user type can be changed to any of those available, meaning that if you switch that profile to "Payroll Admin", for example, that person will be able to use his/her device ID in the web portal and start approving timesheets, or whatever functionality comes with the specified user type. We want to select the one called "IT":


Then we just need to click on the "Update" button at the bottom left of the screen:


That's pretty much it! When you check the profile again, it will now have the updated User Type with all of the rules that are attached to it, which will apply to the reports immediately:


That's all for today, let us know if you have any comments or questions below.


--Econz Team

Friday, August 27, 2021

Custom Questions for Premium Pay

Hello everyone! In today's post we want to show you some brand new functionality that has been added to the system. This is related to Premium Pay, which originally had a set of predetermined all purpose questions, but now, we have made it available for you to enter your own questions.

To set this up, go to the Administration tab and select "Configure Premium Pay Questions", which are now found at the bottom of the Staff section:


Once entering that section, this is what you will see. Notice how the first option allows you to use the "Device Defaults" in case you don't wish to edit the questions:


The system will give you the option to write questions in English and in Spanish, as noted by the top buttons. The beautiful thing is that depending on what language you use, the questions will be translated on the device automatically, depending on whether the language is set to either English or Spanish.

Let's go ahead and enter our own questions, the default examples give us a hint as to where the questions will be used, so we are going to enter our own as follows. First in English:


Then in Spanish:


Finally, we have examples of how the questions are displayed depending on the language the device is setup with:


And another side by side comparison:


We hope you can take full advantage of this feature and make Timecard GPS even more customized to your needs!


Until next time.


--Econz Team

Tuesday, August 10, 2021

Timesheet Signoff with Operations Managers

We have previously discussed about our important Timesheet Signoff feature and the different user types that can be created to take advantage of the functionality. Today we will focus on the Operation Manager user type.

The first step to set this up is to login in as an Administrator user, then go to the Administration tab, then Preferences. Inside this section, you will find the following settings, make sure to check "Enable TimeSheet Signoff", while at the same time uncheck "Enable Teams for Operations Manager". The first setting just enables the usage of the whole functionality, but the second one is important to be able to assign tasks to specific managers so that they can focus on approving punches for those:


To create an Operations Manager profile, we need to go to the Administration tab and then Manage Users. There is an "Add New" button on the top left where we can click to see a screen just like this one:


Make sure to set the User Type to "Operations Manager", then adjust the time zone and enter the Login ID and Name of the user. You can skip to New Password and Confirm Password where we recommend to use a strong password for security purposes, then click on "Add New" at the bottom.

The next step is to assign the newly added manager to tasks. The idea behind this is that there could be different supervisors in charge of overviewing different projects, so a company may need to have these supervisors approve timesheets only for their own projects, so they don't need to see other manager's tasks. The way to ensure that is the case, is by following this process of assigning managers to a job, which in turn will enable the system to show those punches in that Operation Manager's web portal.

For this, we go to the "Maintain Task/Customer List" section and in this case we pick a task inside the "Region B" team:


After clicking on its Task ID, we will be able to assign the profile by using the dropdown menu from the "Task Owner/Manager" section. In this example, we have assigned the "BerlinOperations" profile. Then click on Save:


Something important to keep in mind is that assigning Operations Managers to tasks doesn't affect the way that the application works for field employees, as they will be able to clock in and out and switch between tasks as normal without any indication of what manager supervises what project. After the worked period is finished and the time to approve timesheets comes, employees will proceed as usual, which is by going to the main screen, open the menu and select "Timesheet Signoff", then logging in with their credentials:


Next, they will review and sign their timesheets, then send them for approval:


Once confirmed, after a few seconds, a green thumbs up icon will be shown to let the employee know that the data has been sent successfully:


At this point, is where the Operations Manager comes in! In this example, we are signing in as BerlinOperations, then go the Administration tab to find the "Approve Timesheets" section:


We can use the different filters to focus on team or a specific individual, here we want to see Joy Morris' punches for August 5. The Approval Status is set to "Worker Accepted", this means that it's awaiting Manager Approval. We then click on the the timesheet ID on the left of the screen:


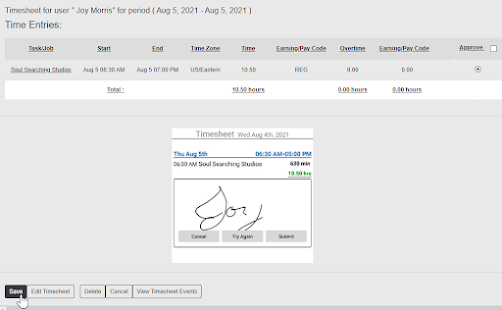
That will take us to the Approval screen, where we can review the worked time and view the employee's signature, when we are ready to approve the timesheet, we just click the radial button in the Approve column next to the task that needs to be approved, then click on Save on the bottom left of the screen:
Click on the image to enlarge

Then we will get a confirmation screen, so we just click on "Save changes":


And finally, when we go back to the screen where we filter the current timesheets, we will see that its status changed to "Management Approved":


That's all for today, leave us a comment below if you have any questions!


--Econz Team