Friday, January 20, 2023

New Multi Timesheet Approval Functionality

Hello everyone! We are very pleased to show you a brand new feature we have just deployed called "Multi Timesheet Approval". It's an enhanced method to review and approve timesheets for your staff, where you will be able to easily visualize and approve multiple timesheets in one go.

To find this feature, we would go to the Administration tab, then within the "Basic" section you will find "Multi Timesheet Approval":


Once inside, you can view all the timesheets for the entire company at once, or use the filters to focus on a specific team or user:


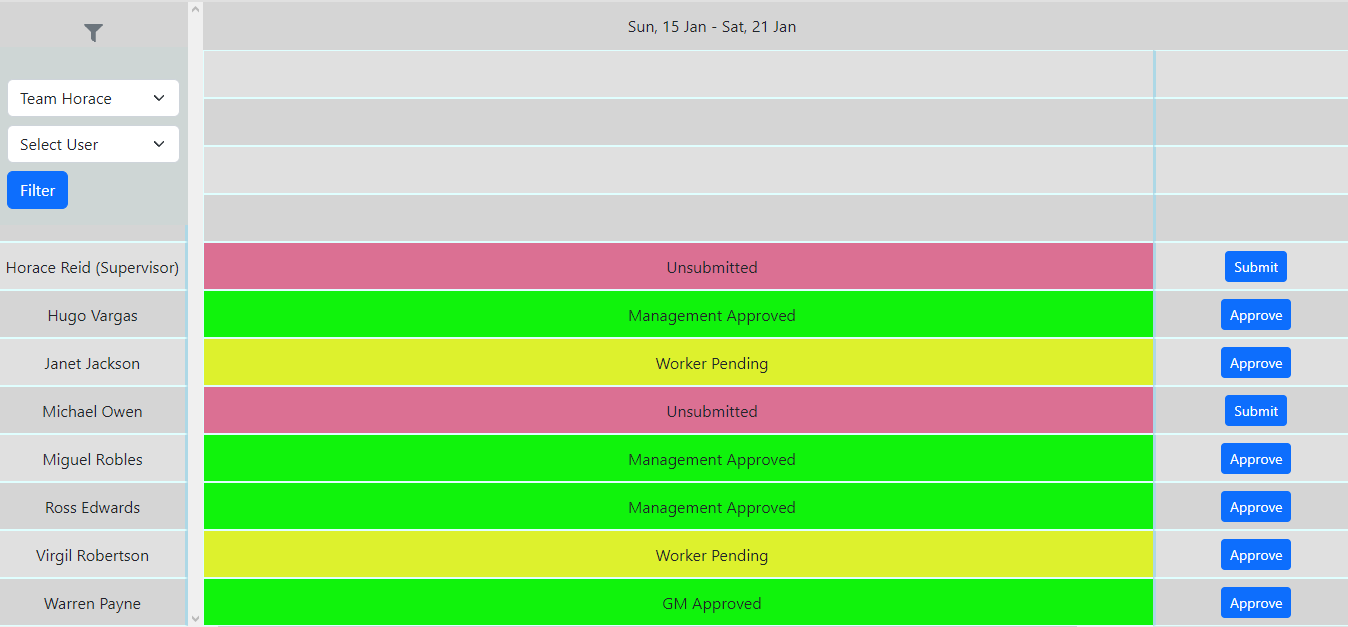
We will filter the screen to visualize just one team for this example, so we pick it from the dropdown menu and click the "Filter" button. You will be able to use the left and right arrows on top of the screen to go back and forward the different timesheet periods. So, here is our current team view:
(Click on image to enlarge)

Notice the different colors depending on the status of the timesheet. We have "Unsubmitted" in red, next stage is "Worker Pending" in green, and finally "Management Approved" or "GM Approved" depending on the settings of your account.

When you click on the status of any users, you will be able to perform a number of different operations:


First up is "Show Details"; clicking this will give you a quick view of the user's timesheet:

(Click on image to enlarge)

Then, we have "Show Full Details", which as indicated, will open a new tab. This is the equivalent of going to the Administration tab, then selecting "Approve Timesheets" and filtering by the date and user... You can start seeing how much time you will save by using this!

(Click on image to enlarge)

The next option is "Edit". This is one of our favorite new features since it will pop up a new style of editing screen right from the same timesheet approval section.

(Click on image to enlarge)

Finally, we have the "Submit Timesheet" button. What this does is that it moves the approval process forward going by the steps described above, that is from Unsubmitted to Worker Pending:


And using the "Submit Timesheet" option from this status, will take you to the final stage, showing the timesheet as approved. Note that you can also use the "Approve" button on the right to perform the same function:


That's all for this time, we will be back with more awesome news for you!


--Econz Team 

Friday, January 13, 2023

Update to Managing Leave Requests as an Administrator

Following up with our previous post about requesting PTO, today we will see how it works from the Administration Portal. Before getting started, you need to make sure to assign an Administrator user to manage each employee's leave requests. This is done by going to the Administration tab and selecting "Manage Users" within the Staff section:


Then, find the name of the employee and click on the ID:


Scroll to the bottom of the screen and find the "Leave Administrator" section. Use the dropdown menu to assign a Leave Admin, then click on Add. After that, click the "Update" button at the bottom:


With that out of the way, let's see what it looks like if an employee sent a Leave Request. We would go to the Administration tab and click "Manage Leave Applications", also on the Staff section:


Here you can see and manage any Leave Requests that need to be reviewed. In this example, we can see a new request that needs to be checked, sent by Randy Howard. You can tell it's new since it has the "Approve" and "Reject" buttons. Note that its status is "Pending" and it even has an attachment that can be downloaded, in case the employee sent any with the request:

(Click on image to enlarge)

If you were to reject it, just click on "Reject" and type the reason for rejection, which will be shown to the employee with a notification within the app. Otherwise, click "Approve" and the system will immediately send a message to the device of the requesting user, just like we saw on our previous post about PTO.

In case you had any staff that does not have the mobile application, or for any reason misplaced the device, you can add a Leave Request in their stead. Notice the "Add New" button on the top of this same screen:


You will be taken to the next screen:


Here you will select the appropriate information for the employee, leave type, start and end times, as well as a comment for the request. Here is an example of us requesting Sick Leave for a staff member:


And if we went back to the Manage Leave Applications section, we would see this request:

(Click on image to enlarge)

That's it for now, let us know if you have any questions or comments about this important and powerful feature!


--Econz Team

Friday, January 6, 2023

Requesting PTO (Vacation and Sick Time) with the Timecard Application

Hello everyone, today we want to tell you about how you can request different types of PTO with Timecard GPS. Today we will focus on the application side of the equation, but on an upcoming post, we will talk about how to use this feature on the Administration side. Whether it's Vacation, Holiday or Sick Leave that you need to request, we have it all, so let's get to it!

The process is pretty intuitive, as you will see... First we start off the Home Screen and open the Menu on the top right.


Then, select the "Manage Schedule" Option:


You will then see two different options called "Schedule" and "Leave Forms". We will talk about the Schedule on an upcoming post, for now, let's stick to "Leave Forms":


On the next screen you will see different options, so you can specify which type of leave you need to request, be it Vacation, Holiday or Sick Leave:


In this example, we want to request Vacation Leave, so we pick that option, then adjust the start and end times and add a note, if needed, then tap "SUBMIT" on the top right of the screen:


We will get a confirmation message, so we select submit again. This will send the request to the server so a Manager can review it:


After that, it comes down to approving or rejecting the request from the Administrator Portal (stay tuned for the next post where you will learn exactly how to do that...), and finally, the employee will receive a confirmation message of the final status of this request:


That's pretty much it! As promised, it's very easy and intuitive to use; let's meet on the next post so you can learn the other side of the coin, what the Managers do on their end.


Until next time,


--Econz Team


Friday, November 25, 2022

Econz Timesheet Date Select

Hello everyone! We are back with some wonderful news and improvements we just released with our Timecard GPS application. This one is related to Timesheet Signoff, we are now enabling the ability to search back in time for a specific timesheet, in case an employee needs to re-approve an edited timesheet or just maybe forgot to sign it...!

We start from the main screen and tap the menu icon on the top right of the screen (the one with the three dots), then select "Timesheet Signoff":


Then, you will notice a couple new things in the timesheet signoff login screen, first, the "Request timesheet for specified date" section with a Calendar icon, and right below it, a "Remember Me" check box, which we'll cover in an upcoming post. Let's go ahead and tap the Calendar!


We are presented with the option to select a specific date, we are going with October 30 for this example, then tap "OK" at the bottom right of the calendar screen.


The app will take us back to the login screen, so let's enter our password and select "LOGIN" to continue:


We will be presented with the timesheets that fall into the selected date. In this example we have it setup so the employee has to sign the timesheets for a weekly period, so that is what we are looking at. In the case of daily timesheets, we would only see that day we picked, and of course, it depends on if we do actually have punches on that date. 


This time we do, so we can review all of our entries and scroll to the bottom to sign:


As always, we will see the green thumbs up when the timesheet has been successfully submitted for approval:


There is a small timeout window after which you will be able to search and approve a different timesheet, just make sure to follow the process we just covered and you will be just fine!


That's all for today, stay tuned for more exciting news!


--Econz Team

Friday, September 30, 2022

Timecard Checker: iOS Task Search Improvement

Hello everyone, today we have an update we have done to our Timecard Checker version of the application. This comes hand in hand with being able to have checker users to select different jobs during the day and it's meant for companies that have a large amount of tasks for their staff to choose from (but of course, we recommend it for everyone!).

With this feature, employees will now be able to search for tasks within Timecard Checker and the way to do it is pretty simple. First, log into your own profile:


In this case we are clocking in, but it will work the exact same way when using the "CHANGE TASK" button:


Then, when displaying the list of jobs, notice that the app will have a "Find" section on top of the list. That is where you will search for the desired task.


Then, it's just a matter of typing the task name and then you will get the desired results! Note that this also works to search for subtasks.


This is now available on iOS, and we are soon to launch this for Android users as well, so stay tuned for more updates!


Until next time,


--Econz Team


Tuesday, September 13, 2022

Timecard v10 New Form Feature: Hold for Later

Hello everyone! Continuing with all of the excellent new features that our new version  Timecard v10 has, we are proud to show you today a very interesting quality of life improvement we have recently added to the Forms: hold for later forms!

As that name implies, the idea here is that you will be able to start a form while on a task and get back to it later, so the app will hold it for you, as the default behavior is to send the form to the server as soon as the task is changed.

In order to enable it, just go to the Settings on the main screen of the application and set the "All-day forms" option to ON:


Now, we are on a Task called "Meditek" so we want to open the Forms section and start filling out some data related to "Accommodation Expenses":


Of course, at this moment we could be on a business lunch and we need to travel back to our hotel after we are done. So we can tap "Done" on the top right and continue with our day, which in this case means switching to the "Travel" task:

Notice that when we access the same form while being on the "Travel" task, it will be completely blank:


So, now we have come back to our hotel room and we are ready to complete the form with the remaining information, so all we need to do is switch back to the "Meditek" task and when going to the forms section, you will notice that the app had saved all the data you entered for that specific task:


That's perfect! All that's left is to add the remaining information, take any needed pictures and tap "Done" when ready:


Once you clock out, the completed form will be sent to the server so that the Managers can access it via the Web Portal.

This is a wonderful time saving feature which will allow you to save and complete forms during your shift, and we really hope you like it! Let us know if you have any questions or comments below.


--Econz Team 

Tuesday, September 6, 2022

Timecard v10 Updates to Team Clock-in Display

Hello everyone! Today we are back with a great quality of feature that has been added to our Timecard v10 application. Our application will now make it easier for Team Leaders to visualize and have access to the profiles of the staff members that have been clocked in using the Team Clock-in feature. The application will now bring to the top of the list whoever is currently active; this way, you won't have to scroll over a long list of employees, which is particularly useful for those companies who have teams with a large group of members.

So, let's check it out! We are showing this with the perspective of a foreman, of course; we need to be clocked in first to be able to clock other team members in. Within the Main Screen, we open the Menu on the top right and select "Manage Team":


This is what the employee list looks like before clocking anyone in.


From here on, we can look for the employee that we need to punch in and tap his/her name:


Let's pick one of the last names on the list, we'll see how it will be brought to the top instantly!


And clocking in another name in the middle, the app will bring it to the top and sort it alphabetically to make it easier to find and manage:


That's all we have for today, this was a short but sweet one and we hope you take full advantage of this great improvement implemented to make your life much easier.

Until next time!


--Econz Team